
线程基础
基本概念
程序
是为完成特定任务,用某种语言编写的一组指令的集合(即代码)
进程
(1)进程是程序的一次执行过程,或是正在运行的一个程序,是动态过程(有它自身的产生,存在和消亡的过程)
(2)进程的启动会占用相应的资源(CPU、内存等)
(3)通俗理解:进程是指运行的程序,启动一个程序(打开一个软件)的过程就是启动一个进程,关闭程序的过程就是进程的消亡过程
线程
(1)线程是由进程创建的,是进程的一个实体
(2)一个进程可以拥有多个线程
(3)举例:百度网盘同时下载多个文件,这就是多线程
单线程
同一个时刻,只允许执行一个进程
多线程
同一个时刻,可以执行多个线程(举例:QQ 可以同时打开多个聊天窗口)
并发
(1)同一个时刻,多个任务交替执行,造成一种 “ 貌似同时 ” 的错觉
(2)实例:单核 CPU 实现的多任务就是并发
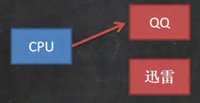
解释:由一个 CPU 来回切换任务,然后执行,这个过程很迅速
并行
(1)同一个时刻,多个任务同时执行,多喝 CPU 可以实现并行,并发和并行
(2)实例:多个 CPU 同时存在,每个 CPU 执行自己的进程
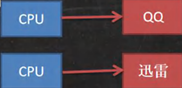
注意:每个 CPU 也可以实现并发
创建线程的两种方法
(1)继承 Thread 类,重 run 方法
(2)实现 Runnable 接口,重写 run 方法
继承 Thead 类
代码示例
java
package Thread;

public class main {
    public static void main(String[] args) {
        a a = new a();
        a.start();
        int i = 0;
        while (true) {
            System.out.println("main " + ++i + "--->" + Thread.currentThread().getName());
            try {
                Thread.sleep(1000);
            } catch (InterruptedException e) {
                e.printStackTrace();
            }
            if (i == 5) {
                break;
            }
        }
    }
}

class a extends Thread {
    @Override
    public void run() {
        int i = 0;
        while (true) {
            System.out.println("hello " + ++i + "--->" +  Thread.currentThread().getName());
            try {
                Thread.sleep(1000);
            } catch (InterruptedException e) {
                e.printStackTrace();
            }
            if (i == 10) {
                break;
            }
        }
    }
}

// 运行结果
main 1--->main
hello 1--->Thread-0
main 2--->main
hello 2--->Thread-0
hello 3--->Thread-0
main 3--->main
main 4--->main
hello 4--->Thread-0
main 5--->main
hello 5--->Thread-0
hello 6--->Thread-0
hello 7--->Thread-0
hello 8--->Thread-0
hello 9--->Thread-0
hello 10--->Thread-0代码分析
(1)sleep()方法会抛出异常,需要用 try - catch 包裹
(2)关系:sleep()方法休眠的单位是毫秒,1000 毫秒=1 秒
(3)获取线程名称的方法:Thread.currentThread().getName()
(4)主线程的结束并不会导致进程的结束,需要等到所有线程都执行完成进程才会退出
启动线程
真正启动线程的是 start()方法,而不是 run()方法,run()方法是普通方法,会造成线程阻塞
⭐start()方法
(1)首先 start()方法会调用 start0() 方法
(2)start0()方法是native方法,由 JVM 机调用
(3)何时启动线程还需根据其他依据综合考虑
%E6%96%B9%E6%B3%95%E8%B0%83%E7%94%A8%E5%9B%BE.DghgtuWQ.png)
(4)如调用 run()方法,并不会启动线程,而是等 run()方法执行完之后才会启动 main 方法的调用
这里 run()方法的线程名就是 main,即调用 run()方法并没有启动线程
java
public class main {
    public static void main(String[] args) {
        a a = new a();
        a.run();
        int i = 0;
        while (true) {
            System.out.println("main " + ++i + "--->" + Thread.currentThread().getName());
            try {
                Thread.sleep(1000);
            } catch (InterruptedException e) {
                e.printStackTrace();
            }
            if (i == 5) {
                break;
            }
        }
    }
}

class a extends Thread {
    @Override
    public void run() {
        int i = 0;
        while (true) {
            System.out.println("hello " + ++i + "--->" +  Thread.currentThread().getName());
            try {
                Thread.sleep(1000);
            } catch (InterruptedException e) {
                e.printStackTrace();
            }
            if (i == 10) {
                break;
            }
        }
    }
}

// 运行结果
hello 1--->main
hello 2--->main
hello 3--->main
hello 4--->main
hello 5--->main
hello 6--->main
hello 7--->main
hello 8--->main
hello 9--->main
hello 10--->main
main 1--->main
main 2--->main
main 3--->main
main 4--->main
main 5--->main实现 Runnable 接口
基本介绍
(1)由于Java 是单继承机制,如果类继承了其他类,这个时候可以通过实现接口的方式创建线程
(2)实现 Runnable 接口方式更适合多个线程共享一个资源的情况,并且避免了单继承的限制,建议使用 Runnable
(3)Runnable 接口没有 start()方法,类实现接口后,实现 run()方法,需要在主线程中创建 Thread 类,调用 Thread 类的 start()方法启动线程,采用了静态代理模式
代码示例
java
package Thread;

public class main {
    public static void main(String[] args) {
        a a = new a();
        Thread thread = new Thread(a);
        thread.start();
        int i = 0;
        while (true) {
            System.out.println("main " + ++i + "--->" + Thread.currentThread().getName());
            try {
                Thread.sleep(1000);
            } catch (InterruptedException e) {
                e.printStackTrace();
            }
            if (i == 5) {
                break;
            }
        }
    }
}

class a implements Runnable {
    @Override
    public void run() {
        int i = 0;
        while (true) {
            System.out.println("hello " + ++i + "--->" +  Thread.currentThread().getName());
            try {
                Thread.sleep(1000);
            } catch (InterruptedException e) {
                e.printStackTrace();
            }
            if (i == 10) {
                break;
            }
        }
    }
}

// 运行结果
main 1--->main
hello 1--->Thread-0
main 2--->main
hello 2--->Thread-0
hello 3--->Thread-0
main 3--->main
main 4--->main
hello 4--->Thread-0
hello 5--->Thread-0
main 5--->main
hello 6--->Thread-0
hello 7--->Thread-0
hello 8--->Thread-0
hello 9--->Thread-0
hello 10--->Thread-0代码分析
(1)实现了Runnable 接口,但是这个接口中并没有 start()方法,不可以直接调用
(2)通过把 a 对象作为参数传入构造器中,调用构造器创建 Thread 对象,调用 Thread 对象的 start()方法
模拟 Thread 类
为什么调用 Thread 的 start()方法就可以调用 a 类的 run()方法?底层采用了静态代理模式
思路分析
既然 Runnable 接口没有 start()方法,那就借助 Thread 类,让它来实现 start()方法(体现代理)
java
public class main {
    public static void main(String[] args) {
        test test = new test();
        Thread_proxy thread_proxy = new Thread_proxy(test);
        thread_proxy.start();
    }
}

class Thread_proxy implements Runnable{

    private Runnable target = null;

    // 构造器
    public Thread_proxy(Runnable target) {
        this.target = target;
    }

    // 实现 run() 方法
    @Override
    public void run() {
        if(target != null){
            target.run();
        }
    }

    public void start(){
        start0();
    }

    public void start0(){
        run();
    }
}

class test implements Runnable{

    @Override
    public void run() {
        System.out.println("调用了 test 类的 run() 方法");
    }
}代码分析
(1)创建 Thread_proxy 类,实现 Runnable() 接口,模拟 Thead 类
(2)创建 test 类,实现 Runnable()接口
(3)在主函数中创建 Thread_proxy 对象,在构造器中传入 test 对象,调用 Thread_proxy 对象的 start()方法来启动线程
底层分析
为什么可以传入 test?
因为 test 是实现了 Runnable 接口的一个类,根据接口的多态,接口类型可指向实现该接口的类对象
如何实现调用 test 类的 run()方法的?
(1)thread_proxy 调用 start()方法,最终调用 start0()方法,该方法调用该类中的 run()方法
(2)此时 target 不为空(target 指向了传入的 test 对象),根据动态绑定机制,这个时候会调用 test 类的 run()方法
线程终止
基本介绍
(1)当线程完成任务后,会自动退出
(2)通过使用变量来控制 run()方法退出的方式停止线程,即通知线程退出
核心思想
子线程初始设置为死循环,提供 setter()方法,在主线程中在需要结束子线程的时候通过改变变量的值来实现
代码示例
java
public class main {
    public static void main(String[] args) throws InterruptedException {
        a a = new a();
        a.start();
        System.out.println("主线程休眠10s~~");
        Thread.sleep(10 * 1000);
        a.setLoop(false);
    }
}

class a extends Thread {
    private int i = 0;

    public void setLoop(boolean loop) {
        this.loop = loop;
    }

    private boolean loop = true;
    @Override
    public void run() {

        while (loop) {
            System.out.println("a " + ++i + "--->" +  Thread.currentThread().getName());
            try {
                Thread.sleep(1000);
            } catch (InterruptedException e) {
                e.printStackTrace();
            }
        }
    }
}

// 输出结果
主线程休眠10s~~
a 1--->Thread-0
a 2--->Thread-0
a 3--->Thread-0
a 4--->Thread-0
a 5--->Thread-0
a 6--->Thread-0
a 7--->Thread-0
a 8--->Thread-0
a 9--->Thread-0
a 10--->Thread-0代码分析
(1)在子线程中设置 loop 变量
(2) 在主线程中,让主线程休眠 10s 后,通知子线程退出(loop = false)
(3) 由于子线程也是每输出依次就会休眠 1s,和主线程达到了同步,所以结果会输出 10 次