
部门管理
列表查询
需求分析
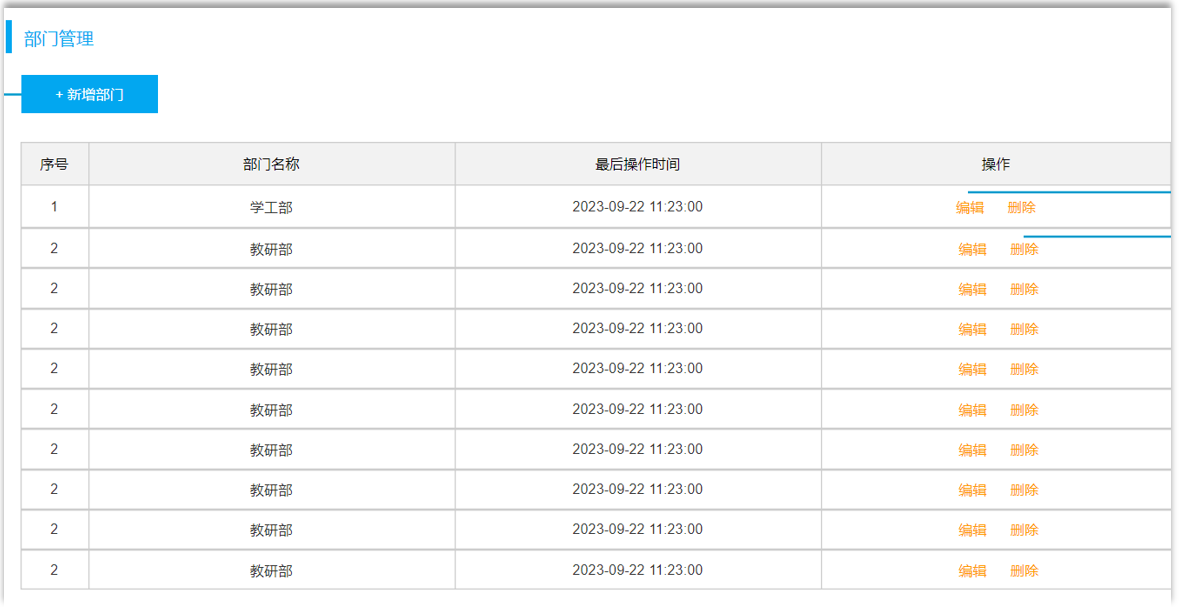
根据页面原型、需求说明、接口文档,先完成页面的基本布局,可以参考 ElementPlus 中的组件,拷贝过来适当做一个改造
代码实现
部门管理组件 src/views/dept/index.vue 具体的页面布局代码如下
表格中每一列展示的 prop 属性 都是根据接口文档来的,接口文档返回什么样的数据,我们就安装对应的数据格式进行解析
vue
<script setup>
import { ref } from "vue";

// 示例数据
const deptList = ref([
  {
    id: 1,
    name: "学工部",
    createTime: "2024-09-01T23:06:29",
    updateTime: "2024-09-01T23:06:29",
  },
  {
    id: 2,
    name: "教研部",
    createTime: "2024-09-01T23:06:29",
    updateTime: "2024-09-01T23:06:29",
  },
]);

// 编辑部门 - 根据ID查询回显数据
const handleEdit = (id) => {
  console.log(`Edit item with ID ${id}`);
  // 在这里实现编辑功能
};

// 删除部门 - 根据ID删除部门
const handleDelete = (id) => {
  console.log(`Delete item with ID ${id}`);
  // 在这里实现删除功能
};
</script>

<template>
  <h1>部门管理</h1>

  <!-- 按钮靠页面右侧显示 -->
  <el-button type="primary" @click="handleEdit" style="float: right;">
    + 新增部门</el-button
  >
  <br /><br />

  <el-table :data="deptList" border style="width: 100%;">
    <el-table-column type="index" label="序号" width="100" align="center" />
    <el-table-column prop="name" label="部门名称" width="300" align="center" />
    <el-table-column
      prop="updateTime"
      label="最后修改时间"
      width="300"
      align="center"
    />
    <el-table-column fixed="right" label="操作" align="center">
      <template #default="scope">
        <el-button size="small" @click="handleEdit(scope.row.id)"
          >修改</el-button
        >
        <el-button
          size="small"
          type="danger"
          @click="handleDelete(scope.row.id)"
          >删除</el-button
        >
      </template>
    </el-table-column>
  </el-table>
</template>

<style scoped></style>加载数据
根据需求,需要在新增、修改、删除部门之后,加载最新的部门数据。 在打开页面之后,也需要自动加载部门数据,那接下来,我们就需要基于 axios 发送异步请求,动态获取数据
在页面加载完成后,发送异步请求(https://m1.apifoxmock.com/m1/7162125-6886219-default/depts),动态加载数据,src/views/dept/index.vue 完整代码如下
vue
<script setup>
import { ref, onMounted } from "vue";
import axios from "axios";

//声明列表展示数据
let deptList = ref([]);

//动态加载数据-查询部门
const queryAll = async () => {
  const result = await axios.get(
    "https://apifoxmock.com/m1/3161925-0-default/depts"
  );
  deptList.value = result.data.data;
};

//钩子函数
onMounted(() => {
  queryAll();
});

// 编辑部门 - 根据ID查询回显数据
const handleEdit = (id) => {
  console.log(`Edit item with ID ${id}`);
  // 在这里实现编辑功能
};

// 删除部门 - 根据ID删除部门
const handleDelete = (id) => {
  console.log(`Delete item with ID ${id}`);
  // 在这里实现删除功能
};
</script>

<template>
  <h1>部门管理</h1>

  <!-- 按钮靠页面右侧显示 -->
  <el-button type="primary" @click="handleEdit" style="float: right;">
    + 新增部门</el-button
  >
  <br /><br />

  <el-table :data="deptList" border style="width: 100%;">
    <el-table-column type="index" label="序号" width="100" align="center" />
    <el-table-column prop="name" label="部门名称" width="300" align="center" />
    <el-table-column
      prop="updateTime"
      label="最后修改时间"
      width="300"
      align="center"
    />
    <el-table-column fixed="right" label="操作" align="center">
      <template #default="scope">
        <el-button size="small" @click="handleEdit(scope.row.id)"
          >修改</el-button
        >
        <el-button
          size="small"
          type="danger"
          @click="handleDelete(scope.row.id)"
          >删除</el-button
        >
      </template>
    </el-table-column>
  </el-table>
</template>

<style scoped></style>问题分析
思考:直接在 Vue 组件中,基于 axios 发送异步请求,存在什么问题?
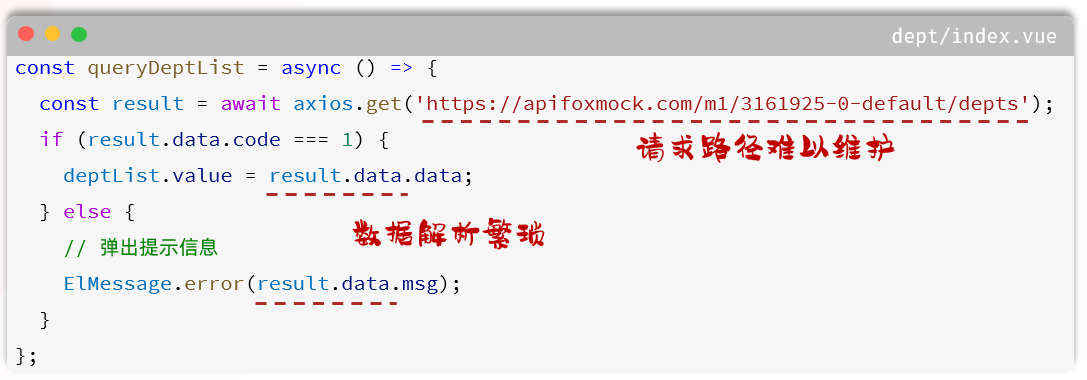
我们刚才在完成部门列表查询时,是直接基于 axios 发送异步请求,直接将接口的请求地址放在组件文件 .vue 中。 而如果开发一个大型的项目,组件文件可能会很多很多很多,如果前端开发完毕,进行前后端联调测试了,需要修改请求地址,那么此时,就需要找到每一个 .vue 文件,然后挨个修改。 所以上述的代码,虽然实现了动态加载数据的功能。 但是存在以下问题
(1)请求路径难以维护
(2)数据解析繁琐
程序优化
(1)为了解决上述问题,我们在前端项目开发时,通常会定义一个请求处理的工具类 - src/utils/request.js 。 在这个工具类中,对 axios 进行了封装。 具体代码如下
js
import axios from "axios";

//创建axios实例对象
const request = axios.create({
  baseURL: "/api",
  timeout: 600000,
});

//axios的响应 response 拦截器
request.interceptors.response.use(
  (response) => {
    //成功回调
    return response.data;
  },
  (error) => {
    //失败回调
    return Promise.reject(error);
  }
);

export default request;(2)而与服务端进行异步交互的逻辑,通常会按模块,封装在一个单独的 API 中,如:src/api/dept.js
js
import request from "@/utils/request";

//列表查询
export const queryAllApi = () => request.get("/depts");(3)修改 src/views/dept/index.vue 中的代码
现在就不需要每次直接调用 axios 发送异步请求了,只需要将我们定义的对应模块的 API 导入进来,就可以直接使用了
vue
<script setup>
import { ref, onMounted } from "vue";
import { queryAllApi } from "@/api/dept";

//声明列表展示数据
let deptList = ref([]);

//动态加载数据-查询部门
const queryAll = async () => {
  const result = await queryAllApi();
  deptList.value = result.data;
};

//钩子函数
onMounted(() => {
  queryAll();
});

// 编辑部门 - 根据ID查询回显数据
const handleEdit = (id) => {
  console.log(`Edit item with ID ${id}`);
  // 在这里实现编辑功能
};

// 删除部门 - 根据ID删除部门
const handleDelete = (id) => {
  console.log(`Delete item with ID ${id}`);
  // 在这里实现删除功能
};
</script>做完上面这三步之后,我们打开浏览器发现,并不能访问到接口数据。原因是因为,目前请求路径不对
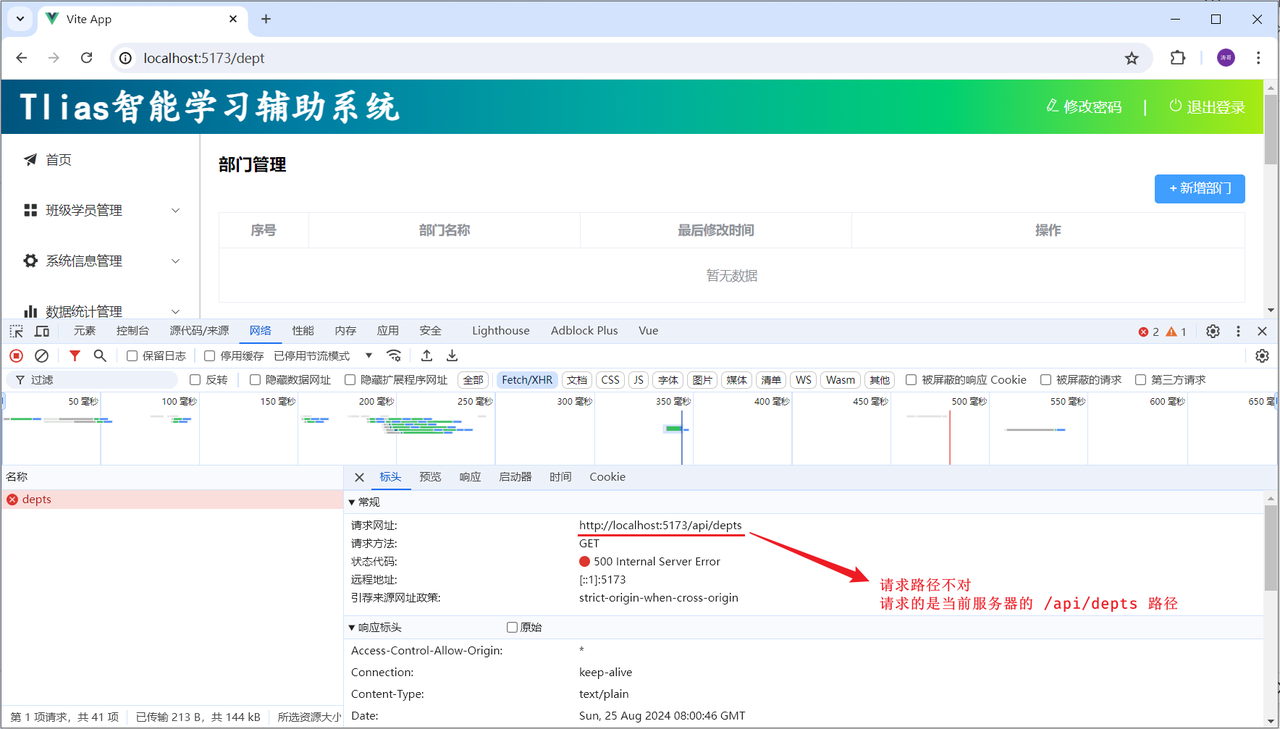
(4) 在 vite.config.js 中配置前端请求服务器的信息
在服务器中配置代理 proxy 的信息,并在配置代理时,执行目标服务器。 以及 url 路径重写的规则

js
import { fileURLToPath, URL } from "node:url";

import { defineConfig } from "vite";
import vue from "@vitejs/plugin-vue";

// https://vitejs.dev/config/
export default defineConfig({
  plugins: [vue()],
  resolve: {
    alias: {
      "@": fileURLToPath(new URL("./src", import.meta.url)),
    },
  },
  server: {
    proxy: {
      "/api": {
        target: "http://localhost:8080",
        secure: false,
        changeOrigin: true,
        rewrite: (path) => path.replace(/^\/api/, ""),
      },
    },
  },
});(5)然后,我们就可以启动服务器端的程序(将之前开发的服务端程序启动起来测试一下 ),进行测试了
⚠️ 注意:测试时,记得将令牌校验的过滤器及拦截器,以及记录日志的 AOP 程序全部注释

新增部门
代码实现
(1)在 src/views/dept/index.vue 中完成页面布局,并编写交互逻辑,完成数据绑定
vue
<script setup>
import { ref, onMounted } from "vue";
import { ElMessage } from "element-plus";
import { queryAllApi, addDeptApi } from "@/api/dept";

// 声明列表展示数据
let deptList = ref([]);

// 动态加载数据 - 查询部门
const queryAll = async () => {
  const result = await queryAllApi();
  deptList.value = result.data;
};

// 钩子函数
onMounted(() => {
  queryAll();
});

// 编辑部门 - 根据ID查询回显数据
const handleEdit = (id) => {
  console.log(`Edit item with ID ${id}`);
  // 在这里实现编辑功能
};

// 删除部门 - 根据ID删除部门
const handleDelete = (id) => {
  console.log(`Delete item with ID ${id}`);
  // 在这里实现删除功能
};

const formTitle = ref("");
//新增部门
const add = () => {
  formTitle.value = "新增部门";
  showDialog.value = true;
  deptForm.value = { name: "" };
};

// 新增部门对话框的状态
const showDialog = ref(false);
// 表单数据
const deptForm = ref({ name: "" });
// 表单验证规则
const formRules = ref({
  name: [
    { required: true, message: "请输入部门名称", trigger: "blur" },
    { min: 2, max: 10, message: "长度在 2 到 10 个字符", trigger: "blur" },
  ],
});

// 表单标签宽度
const formLabelWidth = ref("120px");
// 表单引用
const deptFormRef = ref(null);

// 重置表单
const resetForm = () => {
  deptFormRef.value.resetFields();
};

// 提交表单
const save = async () => {
  await deptFormRef.value.validate(async (valid) => {
    if (!valid) return;
    // 提交表单
    const result = await addDeptApi(deptForm.value);
    if (result.code) {
      ElMessage.success("操作成功");
      // 关闭对话框
      showDialog.value = false;
      // 重置表单
      resetForm();
      // 重新加载数据
      queryAll();
    } else {
      ElMessage.error(result.msg);
    }
  });
};
</script>

<template>
  <h1>部门管理</h1>

  <!-- 按钮靠页面右侧显示 -->
  <el-button type="primary" @click="add()" style="float: right;">
    + 新增部门</el-button
  >
  <br /><br />

  <!-- 数据展示表格 -->
  <el-table :data="deptList" border style="width: 100%;">
    <el-table-column type="index" label="序号" width="100" align="center" />
    <el-table-column prop="name" label="部门名称" width="300" align="center" />
    <el-table-column
      prop="updateTime"
      label="最后修改时间"
      width="300"
      align="center"
    />
    <el-table-column fixed="right" label="操作" align="center">
      <template #default="scope">
        <el-button size="small" @click="handleEdit(scope.row.id)"
          >修改</el-button
        >
        <el-button
          size="small"
          type="danger"
          @click="handleDelete(scope.row.id)"
          >删除</el-button
        >
      </template>
    </el-table-column>
  </el-table>

  <!-- 新增部门的对话框 -->
  <el-dialog
    v-model="showDialog"
    :title="formTitle"
    width="30%"
    @close="resetForm"
  >
    <el-form :model="deptForm" :rules="formRules" ref="deptFormRef">
      <el-form-item label="部门名称" prop="name" label-width="80px">
        <el-input v-model="deptForm.name" autocomplete="off"></el-input>
      </el-form-item>
    </el-form>

    <template #footer>
      <span class="dialog-footer">
        <el-button @click="showDialog = false">取消</el-button>
        <el-button type="primary" @click="save">确定</el-button>
      </span>
    </template>
  </el-dialog>
</template>

<style scoped></style>(2)src/api/dept.js 文件中完整代码如下
js
import request from "@/utils/request";

//查询全部部门
export const queryAllApi = () => request.get("/depts");

//添加部门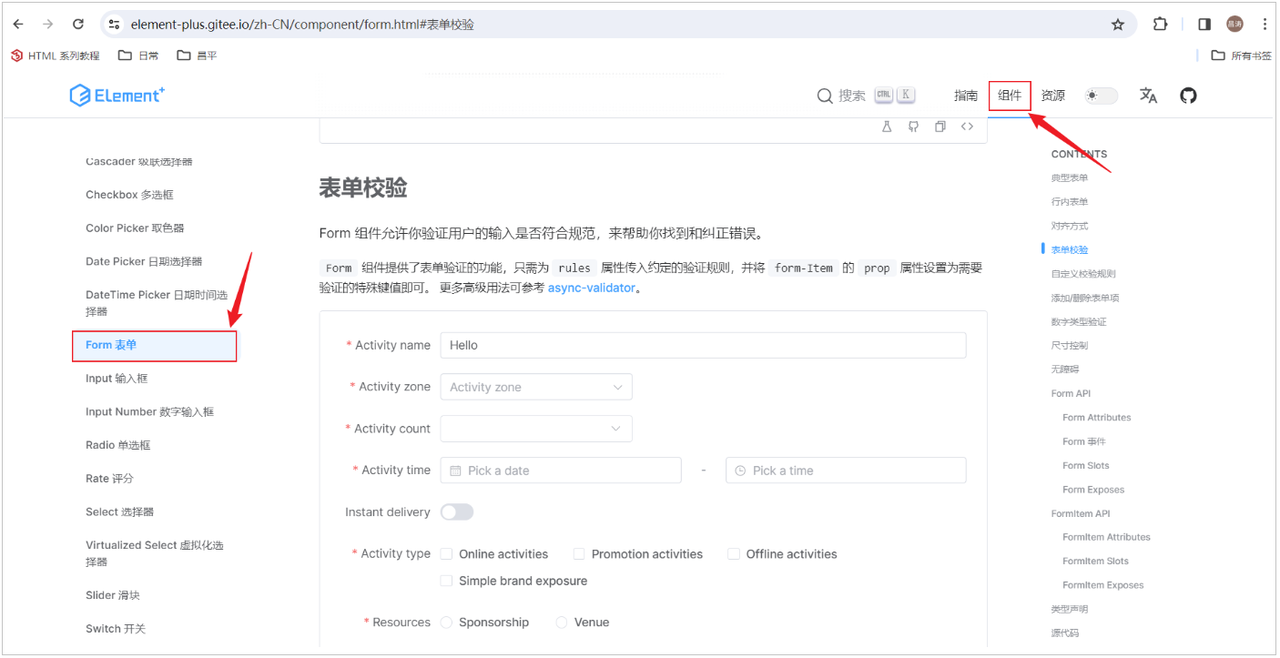
export const addDeptApi = (data) => request.post("/depts", data);表单校验
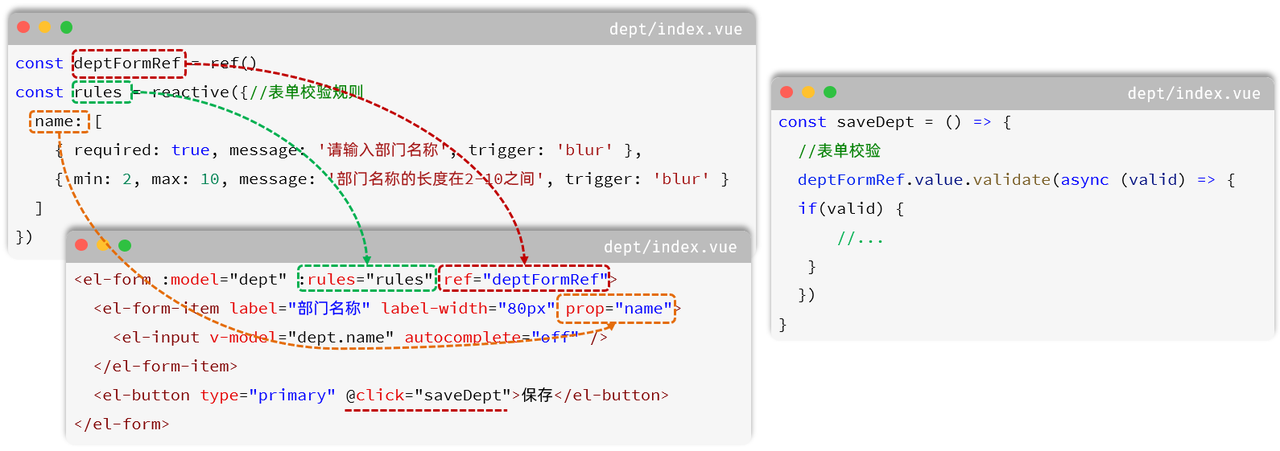
Form 组件允许你验证用户的输入是否符合规范,来帮助你找到和纠正错误。Form 组件提供了表单验证的功能,只需为 rules 属性传入约定的验证规则,并将 form-Item 的 prop 属性设置为需要验证的特殊键值即可
操作步骤
(1)通过 ref 属性注册元素的引用
(2)定义表单校验规则,通过 rules 属性与表单绑定,并通过 prop 属性绑定对应的表单项
(3)表单提交时,校验表单,校验通过,则允许提交表单
修改部门
查询回显
(1)在 src/api/dept.js 中定义根据 id 查询的请求
js
//根据ID查询
export const queryInfoApi = (id) => request.get(`/depts/${id}`);(2)在 src/views/dept/index.vue 中添加根据 ID 查询回显的逻辑,为修改按钮绑定事件 <template></template>
html
<el-button size="small" @click="handleEdit(scope.row.id)">修改</el-button>(3)在 <script> </script> 添加 JS 逻辑
js
// 编辑部门 - 根据ID查询回显数据
const handleEdit = async (id) => {
  console.log(`Edit item with ID ${id}`);
  formTitle.value = "修改部门";
  showDialog.value = true;
  deptForm.value = { name: "" };

  const result = await queryInfoApi(id);
  if (result.code) {
    deptForm.value = result.data;
  }
};到目前为止,完整的 src/views/dept/index.vue 代码如下
vue
<script setup>
import { ref, onMounted } from "vue";
import { ElMessage } from "element-plus";
import { queryAllApi, addDeptApi, queryInfoApi } from "@/api/dept";

// 声明列表展示数据
let deptList = ref([]);

// 动态加载数据 - 查询部门
const queryAll = async () => {
  const result = await queryAllApi();
  deptList.value = result.data;
};

// 钩子函数
onMounted(() => {
  queryAll();
});

// 编辑部门 - 根据ID查询回显数据
const handleEdit = async (id) => {
  console.log(`Edit item with ID ${id}`);
  formTitle.value = "修改部门";
  showDialog.value = true;
  deptForm.value = { name: "" };

  const result = await queryInfoApi(id);
  if (result.code) {
    deptForm.value = result.data;
  }
};

const formTitle = ref("");
//新增部门
const add = () => {
  formTitle.value = "新增部门";
  showDialog.value = true;
  deptForm.value = { name: "" };
};

// 删除部门 - 根据ID删除部门
const handleDelete = (id) => {
  console.log(`Delete item with ID ${id}`);
  // 在这里实现删除功能
};

// 新增部门对话框的状态
const showDialog = ref(false);
// 表单数据
const deptForm = ref({ name: "" });
// 表单验证规则
const formRules = ref({
  name: [
    { required: true, message: "请输入部门名称", trigger: "blur" },
    { min: 2, max: 10, message: "长度在 2 到 10 个字符", trigger: "blur" },
  ],
});

// 表单引用
const deptFormRef = ref(null);

// 重置表单
const resetForm = () => {
  deptFormRef.value.resetFields();
};

// 提交表单
const save = async () => {
  await deptFormRef.value.validate(async (valid) => {
    if (!valid) return;
    // 提交表单
    const result = await addDeptApi(deptForm.value);
    if (result.code) {
      ElMessage.success("操作成功");
      // 关闭对话框
      showDialog.value = false;
      // 重置表单
      resetForm();
      // 重新加载数据
      queryAll();
    } else {
      ElMessage.error(result.msg);
    }
  });
};
</script>

<template>
  <h1>部门管理</h1>

  <!-- 按钮靠页面右侧显示 -->
  <el-button type="primary" @click="add()" style="float: right;">
    + 新增部门</el-button
  >
  <br /><br />

  <!-- 数据展示表格 -->
  <el-table :data="deptList" border style="width: 100%;">
    <el-table-column type="index" label="序号" width="100" align="center" />
    <el-table-column prop="name" label="部门名称" width="300" align="center" />
    <el-table-column
      prop="updateTime"
      label="最后修改时间"
      width="300"
      align="center"
    />
    <el-table-column fixed="right" label="操作" align="center">
      <template #default="scope">
        <el-button size="small" @click="handleEdit(scope.row.id)"
          >修改</el-button
        >
        <el-button
          size="small"
          type="danger"
          @click="handleDelete(scope.row.id)"
          >删除</el-button
        >
      </template>
    </el-table-column>
  </el-table>

  <!-- 新增部门的对话框 -->
  <el-dialog
    v-model="showDialog"
    :title="formTitle"
    width="30%"
    @close="resetForm"
  >
    <el-form :model="deptForm" :rules="formRules" ref="deptFormRef">
      <el-form-item label="部门名称" prop="name" label-width="80px">
        <el-input v-model="deptForm.name" autocomplete="off"></el-input>
      </el-form-item>
    </el-form>

    <template #footer>
      <span class="dialog-footer">
        <el-button @click="showDialog = false">取消</el-button>
        <el-button type="primary" @click="save">确定</el-button>
      </span>
    </template>
  </el-dialog>
</template>

<style scoped></style>保存修改
那应该如何辨别到底是新增,还是修改操作呢 ?
其实,我们只需要根据 deptForm 对象的 id 属性值,来判断即可
如果没有 id,则是新增操作
如果有 id,则是修改操作
(1)在 src/api/dept.js 中增加如下修改部门的请求
js
//修改部门
export const updateDeptApi = (data) => request.put("/depts", data);(2)在 src/views/dept/index.vue 中引入上述函数,并完善(修改) save 函数的逻辑
js
import {
  queryAllApi,
  addDeptApi,
  queryInfoApi,
  updateDeptApi,
} from "@/api/dept";

// 提交表单
const save = async () => {
  await deptFormRef.value.validate(async (valid) => {
    if (!valid) return;
    // 提交表单
    let result = null;
    if (deptForm.value.id) {
      result = await updateDeptApi(deptForm.value); // 修改
    } else {
      result = await addDeptApi(deptForm.value); // 新增
    }
    if (result.code) {
      ElMessage.success("操作成功");
      // 关闭对话框
      showDialog.value = false;
      // 重置表单
      resetForm();
      // 重新加载数据
      queryAll();
    } else {
      ElMessage.error(result.msg);
    }
  });
};完整代码
src/views/dept/index.vue 完整代码如下
vue
<script setup>
import { ref, onMounted } from "vue";
import { ElMessage } from "element-plus";
import {
  queryAllApi,
  addDeptApi,
  queryInfoApi,
  updateDeptApi,
} from "@/api/dept";

// 声明列表展示数据
let deptList = ref([]);

// 动态加载数据 - 查询部门
const queryAll = async () => {
  const result = await queryAllApi();
  deptList.value = result.data;
};

// 钩子函数
onMounted(() => {
  queryAll();
});

const formTitle = ref("");
//新增部门
const add = () => {
  formTitle.value = "新增部门";
  showDialog.value = true;
  deptForm.value = { name: "" };
};

// 编辑部门 - 根据ID查询回显数据
const handleEdit = async (id) => {
  console.log(`Edit item with ID ${id}`);
  formTitle.value = "修改部门";
  showDialog.value = true;
  deptForm.value = { name: "" };

  const result = await queryInfoApi(id);
  if (result.code) {
    deptForm.value = result.data;
  }
};

// 删除部门 - 根据ID删除部门
const handleDelete = (id) => {
  console.log(`Delete item with ID ${id}`);
  // 在这里实现删除功能
};

// 新增部门对话框的状态
const showDialog = ref(false);
// 表单数据
const deptForm = ref({ name: "" });
// 表单验证规则
const formRules = ref({
  name: [
    { required: true, message: "请输入部门名称", trigger: "blur" },
    { min: 2, max: 10, message: "长度在 2 到 10 个字符", trigger: "blur" },
  ],
});

// 表单引用
const deptFormRef = ref(null);

// 重置表单
const resetForm = () => {
  deptFormRef.value.resetFields();
};

// 提交表单
const save = async () => {
  await deptFormRef.value.validate(async (valid) => {
    if (!valid) return;
    // 提交表单
    let result = null;
    if (deptForm.value.id) {
      result = await updateDeptApi(deptForm.value); // 修改
    } else {
      result = await addDeptApi(deptForm.value); // 新增
    }
    if (result.code) {
      ElMessage.success("操作成功");
      // 关闭对话框
      showDialog.value = false;
      // 重置表单
      resetForm();
      // 重新加载数据
      queryAll();
    } else {
      ElMessage.error(result.msg);
    }
  });
};
</script>

<template>
  <h1>部门管理</h1>

  <!-- 按钮靠页面右侧显示 -->
  <el-button type="primary" @click="add()" style="float: right;">
    + 新增部门</el-button
  >
  <br /><br />

  <!-- 数据展示表格 -->
  <el-table :data="deptList" border style="width: 100%;">
    <el-table-column type="index" label="序号" width="100" align="center" />
    <el-table-column prop="name" label="部门名称" width="300" align="center" />
    <el-table-column
      prop="updateTime"
      label="最后修改时间"
      width="300"
      align="center"
    />
    <el-table-column fixed="right" label="操作" align="center">
      <template #default="scope">
        <el-button size="small" @click="handleEdit(scope.row.id)"
          >修改</el-button
        >
        <el-button
          size="small"
          type="danger"
          @click="handleDelete(scope.row.id)"
          >删除</el-button
        >
      </template>
    </el-table-column>
  </el-table>

  <!-- 新增部门的对话框 -->
  <el-dialog
    v-model="showDialog"
    :title="formTitle"
    width="30%"
    @close="resetForm"
  >
    <el-form :model="deptForm" :rules="formRules" ref="deptFormRef">
      <el-form-item label="部门名称" prop="name" label-width="80px">
        <el-input v-model="deptForm.name" autocomplete="off"></el-input>
      </el-form-item>
    </el-form>

    <template #footer>
      <span class="dialog-footer">
        <el-button @click="showDialog = false">取消</el-button>
        <el-button type="primary" @click="save">确定</el-button>
      </span>
    </template>
  </el-dialog>
</template>

<style scoped></style>删除部门
思路分析
点击删除按钮,需要删除当前这条数据,删除完成之后,刷新页面,展示出最新的数据
由于删除是一个比较危险的操作,为避免误操作,通常会在点击删除之后,弹出确认框进行确认
Element 组件:ElMessageBox 消息弹出框组件
(1)在 src/api/dept.js 中增加如下删除部门的请求
js
//删除部门
export const deleteDeptApi = (id) => request.delete(`/depts?id=${id}`);(2)在 src/views/dept/index.vue 中为 删除 按钮绑定事件
html
<el-button size="small" type="danger" @click="handleDelete(scope.row.id)"
  >删除</el-button
>(3)在 src/views/dept/index.vue 编写根据 ID 删除数据的函数
js
// 删除部门 - 根据ID删除部门
const handleDelete = (id) => {
  console.log(`Delete item with ID ${id}`);
  //删除部门时, 需要弹出一个确认框, 如果是确认, 则删除部门
  ElMessageBox.confirm("此操作将永久删除该部门, 是否继续?", "提示", {
    confirmButtonText: "确定",
    cancelButtonText: "取消",
    type: "warning",
  }).then(async () => {
    // 删除部门
    const result = await deleteDeptApi(id);
    if (result.code) {
      ElMessage.success("删除成功");
      queryAll();
    }
  });
};(4)注意上述,用到了 ElementPlus 中的 ElMessageBox 组件,需要 import 导入进来。代码如下
js
import { ElMessage, ElMessageBox } from "element-plus";完整代码
到目前为止,完整的 src/views/dept/index.vue 代码如下
vue
<script setup>
import { ref, onMounted } from "vue";
import { ElMessage, ElMessageBox } from "element-plus";
import {
  queryAllApi,
  addDeptApi,
  queryInfoApi,
  updateDeptApi,
  deleteDeptApi,
} from "@/api/dept";

// 声明列表展示数据
let deptList = ref([]);

// 动态加载数据 - 查询部门
const queryAll = async () => {
  const result = await queryAllApi();
  deptList.value = result.data;
};

// 钩子函数
onMounted(() => {
  queryAll();
});

const formTitle = ref("");
//新增部门
const add = () => {
  formTitle.value = "新增部门";
  showDialog.value = true;
  deptForm.value = { name: "" };
};

// 编辑部门 - 根据ID查询回显数据
const handleEdit = async (id) => {
  console.log(`Edit item with ID ${id}`);
  formTitle.value = "修改部门";
  showDialog.value = true;
  deptForm.value = { name: "" };

  const result = await queryInfoApi(id);
  if (result.code) {
    deptForm.value = result.data;
  }
};

// 删除部门 - 根据ID删除部门
const handleDelete = (id) => {
  console.log(`Delete item with ID ${id}`);
  //删除部门时, 需要弹出一个确认框, 如果是确认, 则删除部门
  ElMessageBox.confirm("此操作将永久删除该部门, 是否继续?", "提示", {
    confirmButtonText: "确定",
    cancelButtonText: "取消",
    type: "warning",
  }).then(async () => {
    // 删除部门
    const result = await deleteDeptApi(id);
    if (result.code) {
      ElMessage.success("删除成功");
      queryAll();
    }
  });
};

// 新增部门对话框的状态
const showDialog = ref(false);
// 表单数据
const deptForm = ref({ name: "" });
// 表单验证规则
const formRules = ref({
  name: [
    { required: true, message: "请输入部门名称", trigger: "blur" },
    { min: 2, max: 10, message: "长度在 2 到 10 个字符", trigger: "blur" },
  ],
});

// 表单引用
const deptFormRef = ref(null);

// 重置表单
const resetForm = () => {
  deptFormRef.value.resetFields();
};

// 提交表单
const save = async () => {
  await deptFormRef.value.validate(async (valid) => {
    if (!valid) return;
    // 提交表单
    let result = null;
    if (deptForm.value.id) {
      result = await updateDeptApi(deptForm.value); // 修改
    } else {
      result = await addDeptApi(deptForm.value); // 新增
    }
    if (result.code) {
      ElMessage.success("操作成功");
      // 关闭对话框
      showDialog.value = false;
      // 重置表单
      resetForm();
      // 重新加载数据
      queryAll();
    } else {
      ElMessage.error(result.msg);
    }
  });
};
</script>

<template>
  <h1>部门管理</h1>

  <!-- 按钮靠页面右侧显示 -->
  <el-button type="primary" @click="add()" style="float: right;">
    + 新增部门</el-button
  >
  <br /><br />

  <!-- 数据展示表格 -->
  <el-table :data="deptList" border style="width: 100%;">
    <el-table-column type="index" label="序号" width="100" align="center" />
    <el-table-column prop="name" label="部门名称" width="300" align="center" />
    <el-table-column
      prop="updateTime"
      label="最后修改时间"
      width="300"
      align="center"
    />
    <el-table-column fixed="right" label="操作" align="center">
      <template #default="scope">
        <el-button size="small" @click="handleEdit(scope.row.id)"
          >修改</el-button
        >
        <el-button
          size="small"
          type="danger"
          @click="handleDelete(scope.row.id)"
          >删除</el-button
        >
      </template>
    </el-table-column>
  </el-table>

  <!-- 新增部门的对话框 -->
  <el-dialog
    v-model="showDialog"
    :title="formTitle"
    width="30%"
    @close="resetForm"
  >
    <el-form :model="deptForm" :rules="formRules" ref="deptFormRef">
      <el-form-item label="部门名称" prop="name" label-width="80px">
        <el-input v-model="deptForm.name" autocomplete="off"></el-input>
      </el-form-item>
    </el-form>

    <template #footer>
      <span class="dialog-footer">
        <el-button @click="showDialog = false">取消</el-button>
        <el-button type="primary" @click="save">确定</el-button>
      </span>
    </template>
  </el-dialog>
</template>

<style scoped></style>