
多层缓存
为什么需要
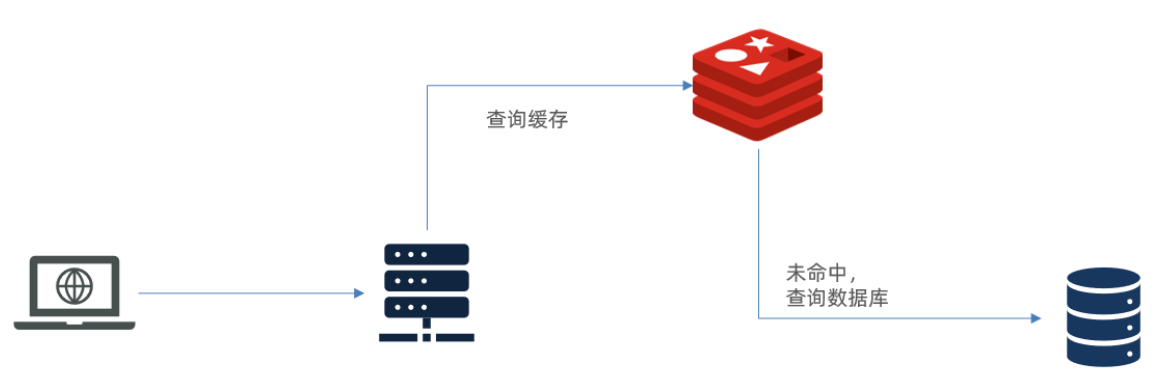
存在如下两个问题
(1)请求要经过 Tomcat 处理,Tomcat 的性能成为整个系统的瓶颈
(2)Redis 缓存失效时,会对数据库产生冲击
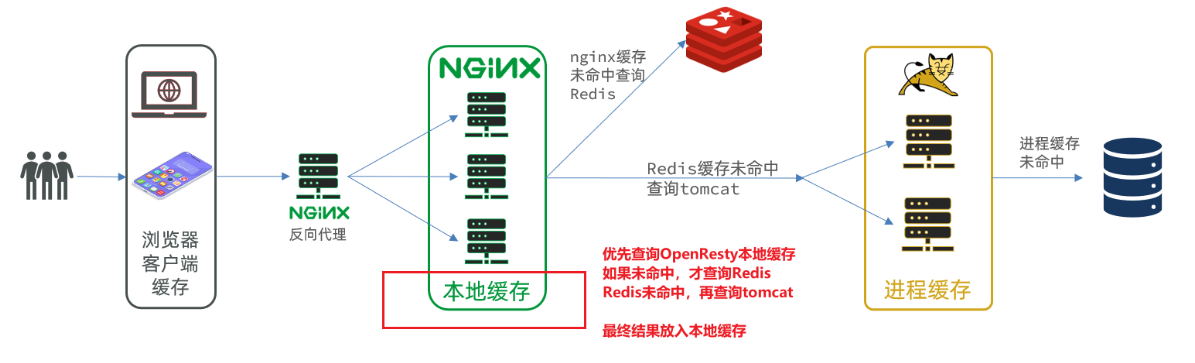
多层缓存架构
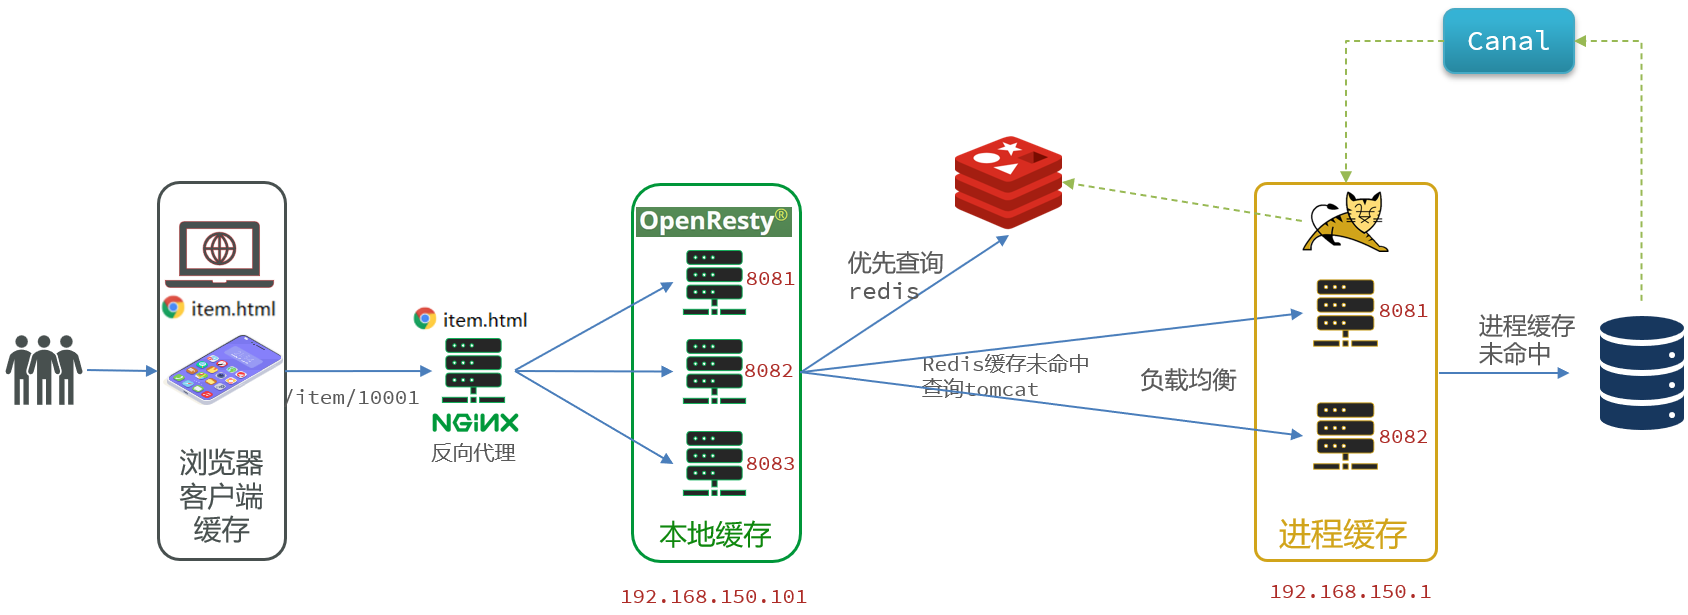
多级缓存就是充分利用请求处理的每个环节,分别添加缓存,减轻 Tomcat 压力,提升服务性能
(1)浏览器访问静态资源时,优先读取浏览器本地缓存
(2)访问非静态资源(ajax 查询数据)时,访问服务端
(3)请求到达 Nginx 后,优先读取 Nginx 本地缓存
(4)如果 Nginx 本地缓存未命中,则去直接查询 Redis(不经过 Tomcat)
(5)如果 Redis 查询未命中,则查询 Tomcat
(6)请求进入 Tomcat 后,优先查询 JVM 进程缓存
(7)如果 JVM 进程缓存未命中,则查询数据库
JVM 进程缓存
基本介绍
缓存在日常开发中启动至关重要的作用,由于是存储在内存中,数据的读取速度是非常快的,能大量减少对数据库的访问,减少数据库的压力。我们把缓存分为两类
(1)分布式缓存,例如 Redis
优点:存储容量更大、可靠性更好、可以在集群间共享
缺点:访问缓存有网络开销
场景:缓存数据量较大、可靠性要求较高、需要在集群间共享
(2)进程本地缓存,例如 HashMap、GuavaCache
优点:读取本地内存,没有网络开销,速度更快
缺点:存储容量有限、可靠性较低、无法共享
场景:性能要求较高,缓存数据量较小
Caffeine
GitHub 地址:https://github.com/ben-manes/caffeine
Caffeine 是一个基于 Java8 开发的,提供了近乎最佳命中率的高性能的本地缓存库。目前 Spring 内部的缓存使用的就是 Caffeine,Caffeine 的性能非常好
基本 API
java
@Test
void testBasicOps() {
    // 构建cache对象
    Cache<String, String> cache = Caffeine.newBuilder().build();

    // 存数据
    cache.put("gf", "迪丽热巴");

    // 取数据
    String gf = cache.getIfPresent("gf");
    System.out.println("gf = " + gf);

    // 取数据,包含两个参数:
    // 参数一:缓存的key
    // 参数二:Lambda表达式,表达式参数就是缓存的key,方法体是查询数据库的逻辑
    // 优先根据key查询JVM缓存,如果未命中,则执行参数二的Lambda表达式
    String defaultGF = cache.get("defaultGF", key -> {
        // 根据key去数据库查询数据
        return "柳岩";
    });
    System.out.println("defaultGF = " + defaultGF);
}Caffeine 既然是缓存的一种,肯定需要有缓存的清除策略,不然的话内存总会有耗尽的时候,提供了三种缓存驱逐策略
注意:在默认情况下,当一个缓存元素过期的时候,Caffeine 不会自动立即将其清理和驱逐。而是在一次读或写操作后,或者在空闲时间完成对失效数据的驱逐
(1)基于容量:设置缓存的数量上限
java
// 创建缓存对象
Cache<String, String> cache = Caffeine.newBuilder()
    .maximumSize(1) // 设置缓存大小上限为 1
.build();(2)基于时间:设置缓存的有效时间
java
// 创建缓存对象
Cache<String, String> cache = Caffeine.newBuilder()
    // 设置缓存有效期为 10 秒,从最后一次写入开始计时
    .expireAfterWrite(Duration.ofSeconds(10))
.build();(3)基于引用:设置缓存为软引用或弱引用,利用GC来回收缓存数据。性能较差,不建议使用
案例实现
(1)需求如下
给根据 id 查询商品的业务添加缓存,缓存未命中时查询数据库
给根据 id 查询商品库存的业务添加缓存,缓存未命中时查询数据库
缓存初始大小为 100
缓存上限为 10000
(2)代码实现
java
// 首先,我们需要定义两个 Caffeine 的缓存对象,分别保存商品、库存的缓存数据
// 在 item-service 的 com.heima.item.config 包下定义 CaffeineConfig 类
package com.heima.item.config;

import com.github.benmanes.caffeine.cache.Cache;
import com.github.benmanes.caffeine.cache.Caffeine;
import com.heima.item.pojo.Item;
import com.heima.item.pojo.ItemStock;
import org.springframework.context.annotation.Bean;
import org.springframework.context.annotation.Configuration;

@Configuration
public class CaffeineConfig {

    @Bean
    public Cache<Long, Item> itemCache(){
        return Caffeine.newBuilder()
                .initialCapacity(100)
                .maximumSize(10_000)
                .build();
    }

    @Bean
    public Cache<Long, ItemStock> stockCache(){
        return Caffeine.newBuilder()
                .initialCapacity(100)
                .maximumSize(10_000)
                .build();
    }
}

// 然后,修改 item-service 中的 com.heima.item.web 包下的 ItemController 类,添加缓存逻辑
@RestController
@RequestMapping("item")
public class ItemController {

    @Autowired
    private IItemService itemService;
    @Autowired
    private IItemStockService stockService;

    @Autowired
    private Cache<Long, Item> itemCache;
    @Autowired
    private Cache<Long, ItemStock> stockCache;

    // ...其它略

    @GetMapping("/{id}")
    public Item findById(@PathVariable("id") Long id) {
        return itemCache.get(id, key -> itemService.query()
                .ne("status", 3).eq("id", key)
                .one()
        );
    }

    @GetMapping("/stock/{id}")
    public ItemStock findStockById(@PathVariable("id") Long id) {
        return stockCache.get(id, key -> stockService.getById(key));
    }
}多级缓存实现
OpenResty
反向代理流程
监听请求
OpenResty 的很多功能都依赖于其目录下的 Lua 库,需要在 nginx.conf 中指定依赖库的目录,并导入依赖
(1)添加对 OpenResty 的 Lua 模块的加载
修改
/usr/local/openresty/nginx/conf/nginx.conf文件,在其中的 http 下面,添加下面代码
bash
# lua 模块
lua_package_path "/usr/local/openresty/lualib/?.lua;;";
# c 模块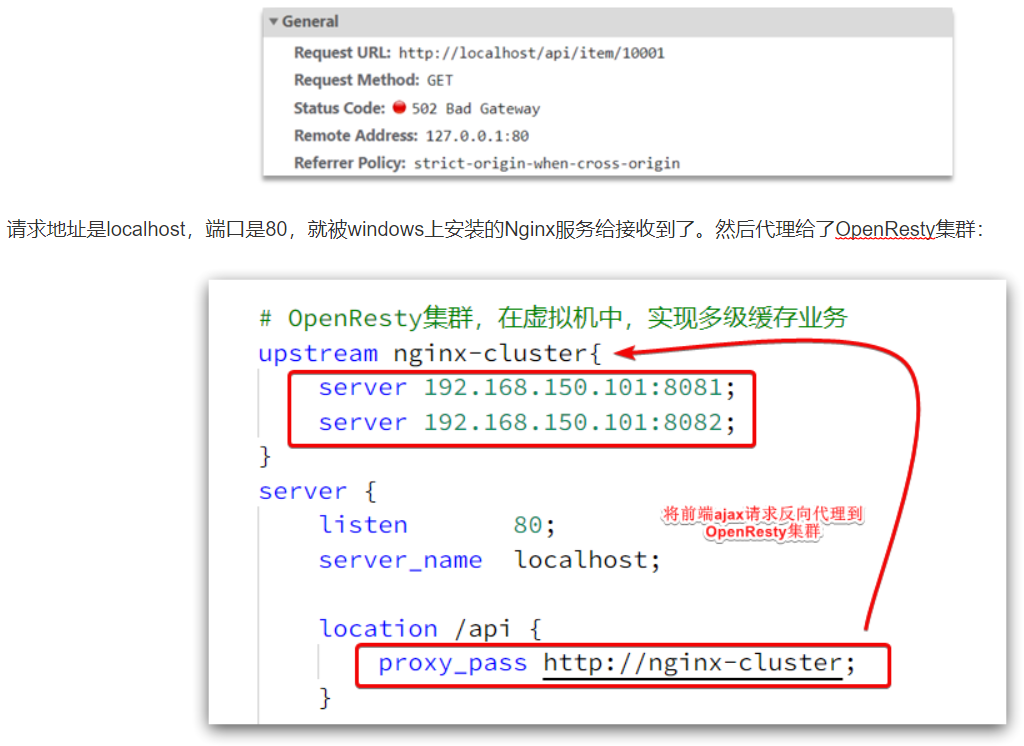
lua_package_cpath "/usr/local/openresty/lualib/?.so;;";(2)监听 /api/item 路径
修改
/usr/local/openresty/nginx/conf/nginx.conf文件,在 nginx.conf的server 下面,添加对 /api/item 这个路径的监听 这个监听,就类似于 SpringMVC 中的
@GetMapping("/api/item")做路径映射,而content_by_lua_file lua/item.lua则相当于调用 item.lua 这个文件,执行其中的业务,把结果返回给用户,相当于 java 中调用 service
bash
location  /api/item {
    # 默认的响应类型
    default_type application/json;
    # 响应结果由lua/item.lua文件来决定
    content_by_lua_file lua/item.lua;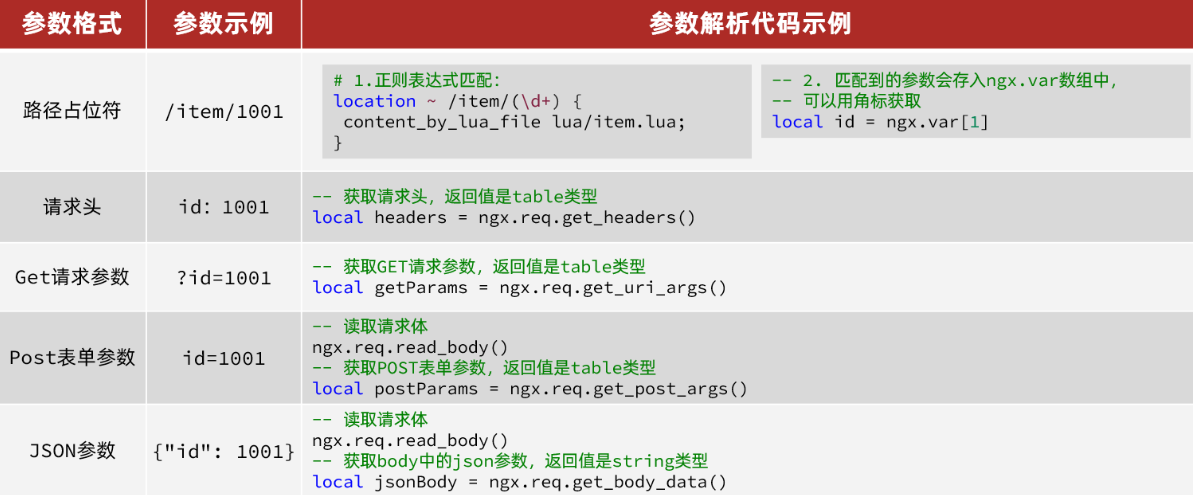
}请求参数处理
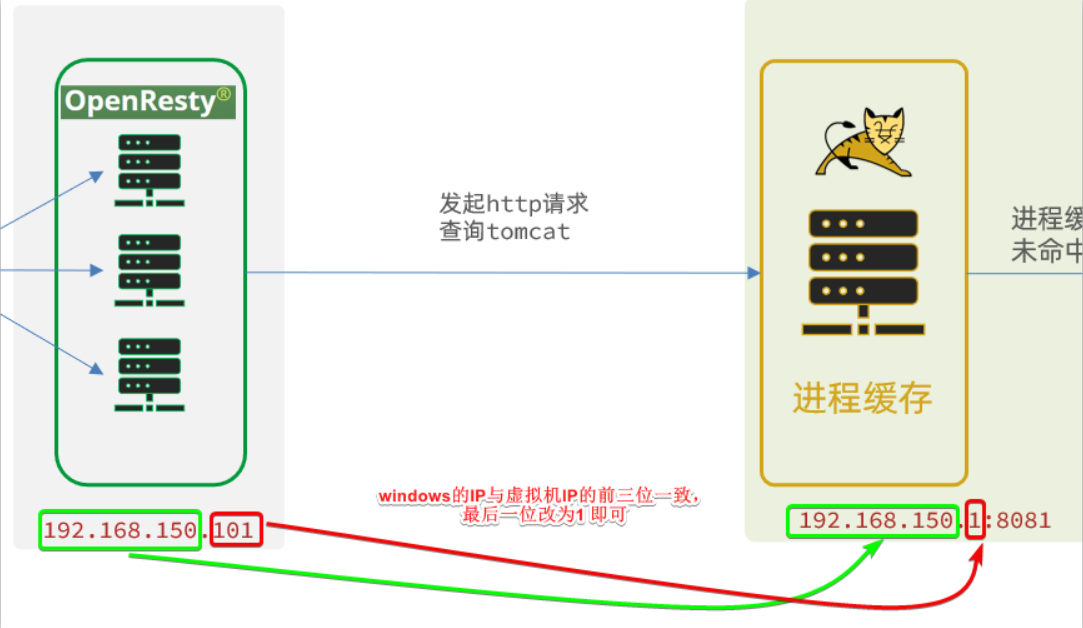
查询 Tomcat
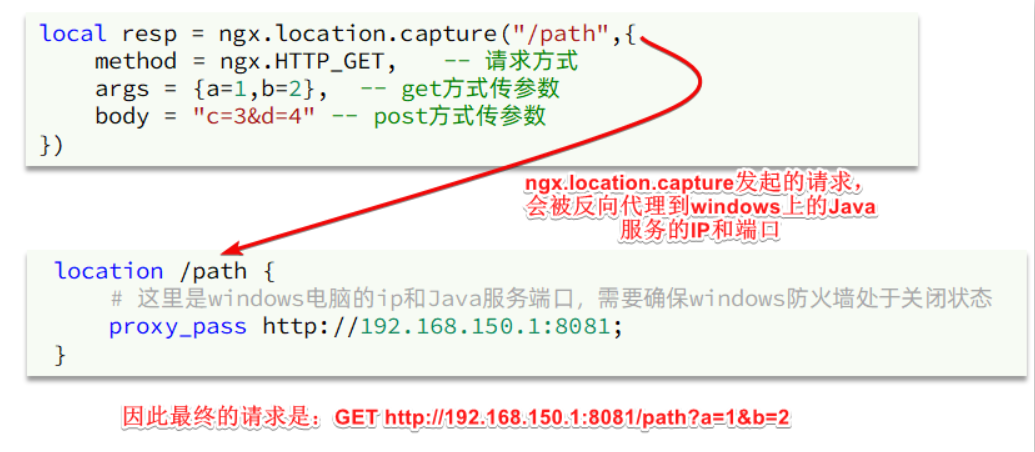
发送 http 请求的 API
lua
local resp = ngx.location.capture("/path",{
    method = ngx.HTTP_GET,   -- 请求方式
    args = {a=1,b=2},  -- get方式传参数
})返回的响应内容包括
resp.status:响应状态码
resp.header:响应头,是一个 table
resp.body:响应体,就是响应数据
注意:这里的 path 是路径,并不包含 IP 和端口。这个请求会被 nginx 内部的 server 监听并处理
但是我们希望这个请求发送到 Tomcat 服务器,所以还需要编写一个 server 来对这个路径做反向代理
bash
location /path {
    # 这里是windows电脑的ip和Java服务端口,需要确保windows防火墙处于关闭状态
    proxy_pass http://192.168.150.1:8081;
}
HTTP 请求工具封装
在
/usr/local/openresty/lualib目录下,新建一个 common.lua 文件
bash
vi /usr/local/openresty/lualib/common.lua内容如下,这个工具将 read_http 函数封装到 _ M这个 table 类型的变量中,并且返回,这类似于导出,使用的时候,可以利用
require('common')来导入该函数库,这里的 common 是函数库的文件名
lua
-- 封装函数,发送 http 请求,并解析响应
local function read_http(path, params)
    local resp = ngx.location.capture(path,{
        method = ngx.HTTP_GET,
        args = params,
    })
    if not resp then
        -- 记录错误信息,返回404
        ngx.log(ngx.ERR, "http请求查询失败, path: ", path , ", args: ", args)
        ngx.exit(404)
    end
    return resp.body
end
-- 将方法导出
local _M = {
    read_http = read_http
}
return _M


-- 调用示例

-- 引入自定义common工具模块,返回值是common中返回的 _M
local common = require("common")
-- 从 common中获取read_http这个函数
local read_http = common.read_http
-- 获取路径参数
local id = ngx.var[1]
-- 根据id查询商品
local itemJSON = read_http("/item/".. id, nil)
-- 根据id查询商品库存
local itemStockJSON = read_http("/item/stock/".. id, nil)CJSON 工具类
官方地址: https://github.com/openresty/lua-cjson/
OpenResty 提供了一个cjson的模块用来处理JSON的序列化和反序列化
lua
-- 引入cjson模块
local cjson = require "cjson"

-- 序列化
local obj = {
    name = 'jack',
    age = 21
}
-- 把 table 序列化为 json
local json = cjson.encode(obj)

-- 反序列化
local json = '{"name": "jack", "age": 21}'
-- 反序列化 json为 table
local obj = cjson.decode(json);
print(obj.name)实现 Tomcat 查询
lua
-- 导入common函数库
local common = require('common')
local read_http = common.read_http
-- 导入cjson库
local cjson = require('cjson')

-- 获取路径参数
local id = ngx.var[1]
-- 根据id查询商品
local itemJSON = read_http("/item/".. id, nil)
-- 根据id查询商品库存
local itemStockJSON = read_http("/item/stock/".. id, nil)

-- JSON转化为lua的table
local item = cjson.decode(itemJSON)
local stock = cjson.decode(stockJSON)

-- 组合数据
item.stock = stock.stock
item.sold = stock.sold

-- 把item序列化为json 返回结果
ngx.say(cjson.encode(item))基于 ID 负载均衡

默认的负载均衡规则是轮询模式,当我们查询 /item/10001 时
第一次会访问 8081 端口的 tomcat 服务,在该服务内部就形成了 JVM 进程缓存
第二次会访问 8082 端口的 tomcat 服务,该服务内部没有 JVM 缓存(因为 JVM 缓存无法共享),会查询数据库
因为轮询的原因,第一次查询 8081 形成的 JVM 缓存并未生效,直到下一次再次访问到 8081 时才可以生效,缓存命中率太低了,如果能让同一个商品,每次查询时都访问同一个 tomcat 服务,那么 JVM 缓存就一定能生效了,也就是说,我们需要根据商品 id 做负载均衡,而不是轮询
(1)原理
nginx 提供了基于请求路径做负载均衡的算法:根据请求路径做 hash 运算,把得到的数值对 tomcat 服务的数量取余,余数是几,就访问第几个服务,实现负载均衡
例如:我们的请求路径是 /item/10001,tomcat 总数为 2 台(8081、8082),对请求路径 /item/1001 做 hash 运算求余的结果为 1,则访问第一个 tomcat 服务,也就是 8081
只要 id 不变,每次 hash 运算结果也不会变,那就可以保证同一个商品,一直访问同一个 tomcat 服务,确保 JVM 缓存生效
(2)实现
修改
/usr/local/openresty/nginx/conf/nginx.conf文件,实现基于 ID 做负载均衡
bash
# 首先,定义 tomcat 集群,并设置基于路径做负载均衡
upstream tomcat-cluster {
    hash $request_uri;
    server 192.168.150.1:8081;
    server 192.168.150.1:8082;
}

# 然后,修改对 tomcat 服务的反向代理,目标指向 tomcat 集群
location /item {
    proxy_pass http://tomcat-cluster;
}

# 重新加载 OpenResty
nginx -s reloadRedis 缓存预热
冷启动:服务刚刚启动时,Redis 中并没有缓存,如果所有商品数据都在第一次查询时添加缓存,可能会给数据库带来较大压力
缓存预热:在实际开发中,我们可以利用大数据统计用户访问的热点数据,在项目启动时将这些热点数据提前查询并保存到 Redis 中
(1)利用 Docker 安装 Redis
bash
docker run --name redis -p 6379:6379 -d redis redis-server --appendonly yes(2)在 item-service 服务中引入 Redis 依赖
xml
<dependency>
    <groupId>org.springframework.boot</groupId>
    <artifactId>spring-boot-starter-data-redis</artifactId>
</dependency>(3)配置 Redis 地址
yaml
spring:
  redis:
host: 192.168.150.101(4)编写初始化类
缓存预热需要在项目启动时完成,并且必须是拿到 RedisTemplate 之后
这里我们利用 InitializingBean 接口来实现,因为 InitializingBean 可以在对象被 Spring 创建并且成员变量全部注入后执行
java
package com.heima.item.config;

import com.fasterxml.jackson.core.JsonProcessingException;
import com.fasterxml.jackson.databind.ObjectMapper;
import com.heima.item.pojo.Item;
import com.heima.item.pojo.ItemStock;
import com.heima.item.service.IItemService;
import com.heima.item.service.IItemStockService;
import org.springframework.beans.factory.InitializingBean;
import org.springframework.beans.factory.annotation.Autowired;
import org.springframework.data.redis.core.StringRedisTemplate;
import org.springframework.stereotype.Component;

import java.util.List;

@Component
public class RedisHandler implements InitializingBean {

    @Autowired
    private StringRedisTemplate redisTemplate;

    @Autowired
    private IItemService itemService;
    @Autowired
    private IItemStockService stockService;

    private static final ObjectMapper MAPPER = new ObjectMapper();

    @Override
    public void afterPropertiesSet() throws Exception {
        // 初始化缓存
        // 1.查询商品信息
        List<Item> itemList = itemService.list();
        // 2.放入缓存
        for (Item item : itemList) {
            // 2.1.item序列化为JSON
            String json = MAPPER.writeValueAsString(item);
            // 2.2.存入redis
            redisTemplate.opsForValue().set("item:id:" + item.getId(), json);
        }

        // 3.查询商品库存信息
        List<ItemStock> stockList = stockService.list();
        // 4.放入缓存
        for (ItemStock stock : stockList) {
            // 2.1.item序列化为JSON
            String json = MAPPER.writeValueAsString(stock);
            // 2.2.存入redis
            redisTemplate.opsForValue().set("item:stock:id:" + stock.getId(), json);
        }
    }
}查询 Redis
1. 根据 id 查询 Redis
2. 如果查询失败则继续查询 Tomcat
3. 将查询结果返回
(1)修改 /usr/local/openresty/lua/item.lua 文件,添加一个查询函数
lua
-- 导入common函数库
local common = require('common')
local read_http = common.read_http
local read_redis = common.read_redis
-- 封装查询函数
function read_data(key, path, params)
    -- 查询本地缓存
    local val = read_redis("127.0.0.1", 6379, key)
    -- 判断查询结果
    if not val then
        ngx.log(ngx.ERR, "redis查询失败,尝试查询http, key: ", key)
        -- redis查询失败,去查询http
        val = read_http(path, params)
    end
    -- 返回数据
    return val
end(2)而后修改商品查询、库存查询的业务
(3)完整的 item.lua 代码
lua
-- 导入common函数库
local common = require('common')
local read_http = common.read_http
local read_redis = common.read_redis
-- 导入cjson库
local cjson = require('cjson')
-- 封装查询函数
function read_data(key, path, params)
-- 查询本地缓存
local val = read_redis("127.0.0.1", 6379, key)
-- 判断查询结果
if not val then
ngx.log(ngx.ERR, "redis查询失败,尝试查询http, key: ", key)
-- redis查询失败,去查询http
val = read_http(path, params)
end
-- 返回数据
return val
end
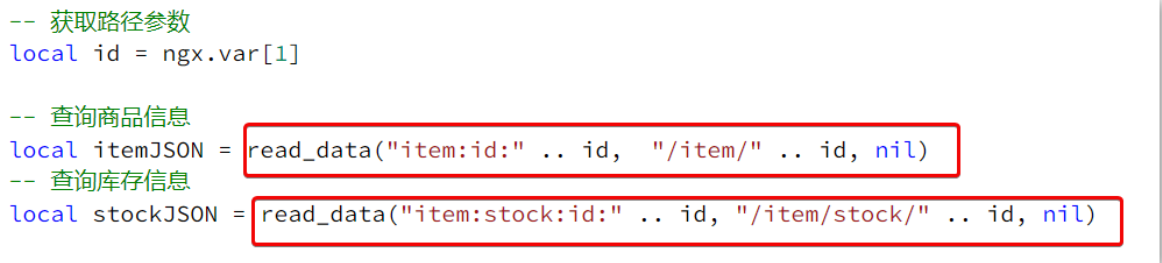
-- 获取路径参数
local id = ngx.var[1]
-- 查询商品信息
local itemJSON = read_data("item:id:" .. id, "/item/" .. id, nil)
-- 查询库存信息
local stockJSON = read_data("item:stock:id:" .. id, "/item/stock/" .. id, nil)
-- JSON转化为lua的table
local item = cjson.decode(itemJSON)
local stock = cjson.decode(stockJSON)
-- 组合数据
item.stock = stock.stock
item.sold = stock.sold
-- 把item序列化为json 返回结果
ngx.say(cjson.encode(item))Nginx 本地缓存
本地缓存 API
OpenResty 为 Nginx 提供了 shard dict 的功能,可以在 nginx 的多个 worker 之间共享数据,实现缓存功能
(1)开启共享字典,在 nginx.conf 的 http 下添加配置
bash
# 共享字典,也就是本地缓存,名称叫做:item_cache,大小 150m
lua_shared_dict item_cache 150m;(2)操作共享字典
lua
-- 获取本地缓存对象
local item_cache = ngx.shared.item_cache
-- 存储, 指定 key、value、过期时间,单位 s,默认为 0 代表永不过期
item_cache:set('key', 'value', 1000)
-- 读取
local val = item_cache:get('key')实现本地缓存查询
修改
/usr/local/openresty/lua/item.lua文件,修改 read_data 查询函数,添加本地缓存逻辑
lua
-- 导入共享词典,本地缓存
local item_cache = ngx.shared.item_cache

-- 封装查询函数
function read_data(key, expire, path, params)
    -- 查询本地缓存
    local val = item_cache:get(key)
    if not val then
        ngx.log(ngx.ERR, "本地缓存查询失败,尝试查询Redis, key: ", key)
        -- 查询redis
        val = read_redis("127.0.0.1", 6379, key)
        -- 判断查询结果
        if not val then
            ngx.log(ngx.ERR, "redis查询失败,尝试查询http, key: ", key)
            -- redis查询失败,去查询http
            val = read_http(path, params)
        end
    end
    -- 查询成功,把数据写入本地缓存
    item_cache:set(key, val, expire)
    -- 返回数据
    return val
end修改 item.lua 中查询商品和库存的业务,实现最新的 read_data 函数

其实就是多了缓存时间参数,过期后 nginx 缓存会自动删除,下次访问即可更新缓存
这里给商品基本信息设置超时时间为 30 分钟,库存为 1 分钟
因为库存更新频率较高,如果缓存时间过长,可能与数据库差异较大
完整的 item.lua 文件
lua
-- 导入common函数库
local common = require('common')
local read_http = common.read_http
local read_redis = common.read_redis
-- 导入cjson库
local cjson = require('cjson')
-- 导入共享词典,本地缓存
local item_cache = ngx.shared.item_cache

-- 封装查询函数
function read_data(key, expire, path, params)
    -- 查询本地缓存
    local val = item_cache:get(key)
    if not val then
        ngx.log(ngx.ERR, "本地缓存查询失败,尝试查询Redis, key: ", key)
        -- 查询redis
        val = read_redis("127.0.0.1", 6379, key)
        -- 判断查询结果
        if not val then
            ngx.log(ngx.ERR, "redis查询失败,尝试查询http, key: ", key)
            -- redis查询失败,去查询http
            val = read_http(path, params)
        end
    end
    -- 查询成功,把数据写入本地缓存
    item_cache:set(key, val, expire)
    -- 返回数据
    return val
end

-- 获取路径参数
local id = ngx.var[1]

-- 查询商品信息
local itemJSON = read_data("item:id:" .. id, 1800,  "/item/" .. id, nil)
-- 查询库存信息
local stockJSON = read_data("item:stock:id:" .. id, 60, "/item/stock/" .. id, nil)

-- JSON转化为lua的table
local item = cjson.decode(itemJSON)
local stock = cjson.decode(stockJSON)
-- 组合数据
item.stock = stock.stock
item.sold = stock.sold

-- 把item序列化为json 返回结果
ngx.say(cjson.encode(item))缓存同步
同步策略
(1)设置有效期:给缓存设置有效期,到期后自动删除。再次查询时更新
优势:简单、方便
缺点:时效性差,缓存过期之前可能不一致
场景:更新频率较低,时效性要求低的业务
(2)同步双写:在修改数据库的同时,直接修改缓存
优势:时效性强,缓存与数据库强一致
缺点:有代码侵入,耦合度高
场景:对一致性、时效性要求较高的缓存数据
(3)异步通知:修改数据库时发送事件通知,相关服务监听到通知后修改缓存数据
优势:低耦合,可以同时通知多个缓存服务
缺点:时效性一般,可能存在中间不一致状态
场景:时效性要求一般,有多个服务需要同步
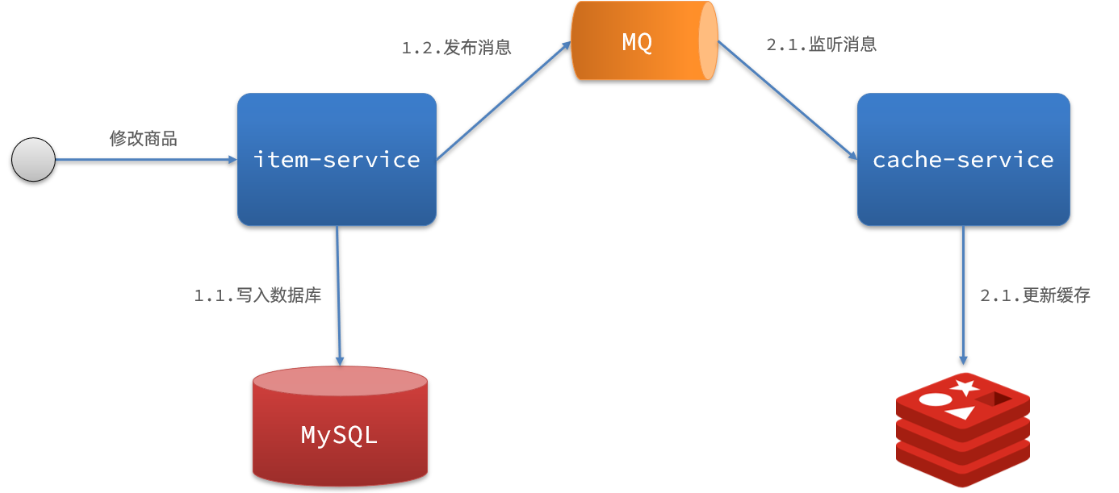
基于 MQ 的异步通知
商品服务完成对数据的修改后,只需要发送一条消息到 MQ 中
缓存服务监听 MQ 消息,然后完成对缓存的更新
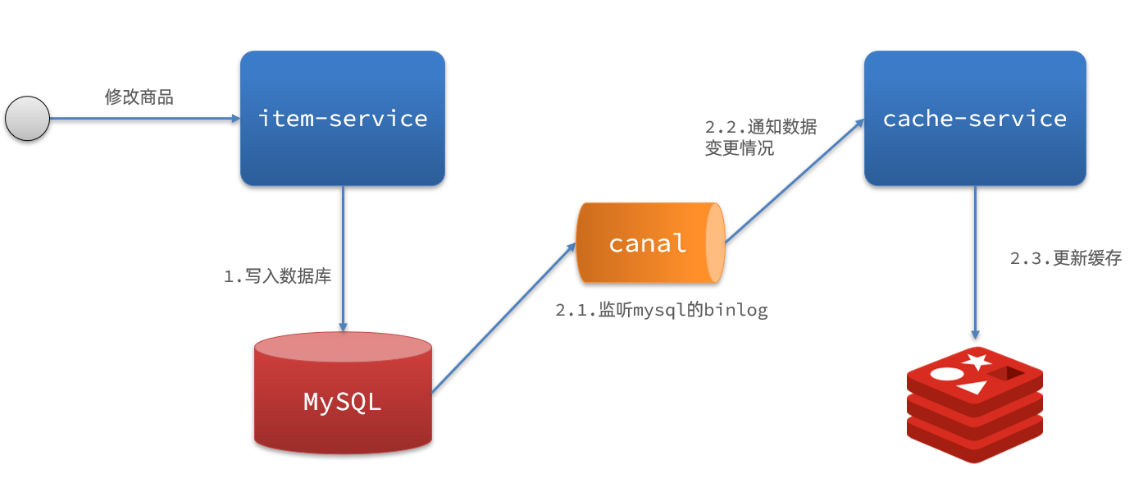
基于 Canal 的异步通知
商品服务完成商品修改后,业务直接结束,没有任何代码侵入
Canal 监听 MySQL 变化,当发现变化后,立即通知缓存服务
缓存服务接收到 Canal 通知,更新缓存
Canal 介绍
GitHub 的地址:https://github.com/alibaba/canal
Canal [ kə'næl ],译意为水道 / 管道 / 沟渠,Canal 是阿里巴巴旗下的一款开源项目,基于 Java 发。基于数据库增量日志解析,提供增量数据订阅 & 消费
Canal 是基于 mysql 的主从同步来实现的,MySQL 主从同步的原理如下
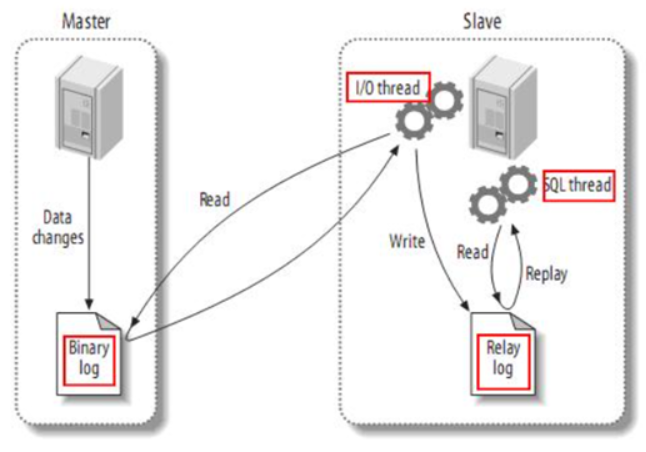
(1)MySQL master 将数据变更写入二进制日志(binary log),其中记录的数据叫做 binary log events
(2)MySQL slave 将 master 的 binary log events拷贝到它的中继日志(relay log)
(3)MySQL slave 重放 relay log 中事件,将数据变更反映它自己的数据
而 Canal 就是把自己伪装成 MySQL 的一个 slave 节点,从而监听 master 的 binary log 变化。再把得到的变化信息通知给 Canal 的客户端,进而完成对其它数据库的同步
监听 Canal
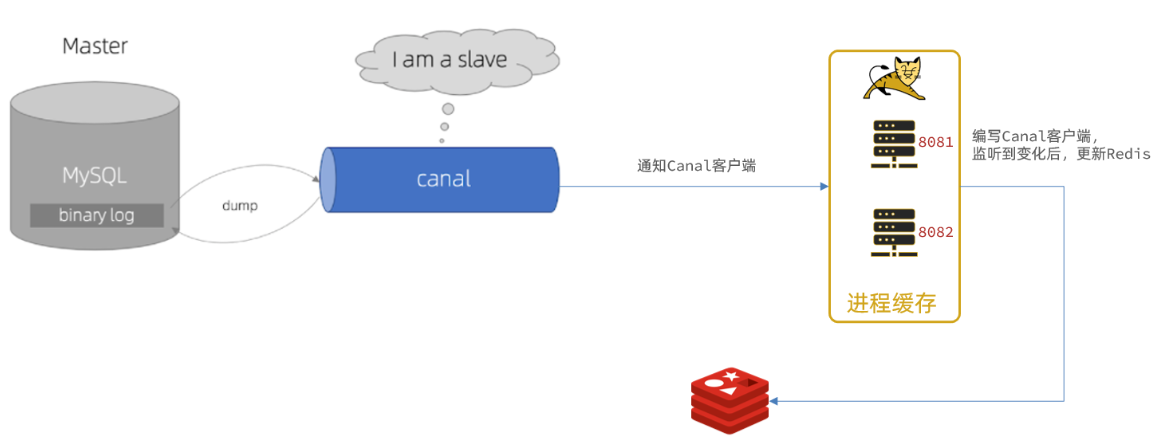
Canal提供了各种语言的客户端,当 Canal 监听到 binlog 变化时,会通知 Canal 的客户端
使用 GitHub 上的第三方开源的 canal-starter 客户端,与 SpringBoot 完美整合,自动装配,比官方客户端要简单好用很多,地址:https://github.com/NormanGyllenhaal/canal-client
(1)引入依赖
xml
<dependency>
    <groupId>top.javatool</groupId>
    <artifactId>canal-spring-boot-starter</artifactId>
    <version>1.2.1-RELEASE</version>
</dependency>(2)编写配置
yaml
canal:
  destination: heima # canal的集群名字,要与安装canal时设置的名称一致
server: 192.168.150.101:11111 # canal服务地址(3)修改 Item 实体类
通过 @Id、@Column、等注解完成 Item 与数据库表字段的映射
java
package com.heima.item.pojo;

import com.baomidou.mybatisplus.annotation.IdType;
import com.baomidou.mybatisplus.annotation.TableField;
import com.baomidou.mybatisplus.annotation.TableId;
import com.baomidou.mybatisplus.annotation.TableName;
import lombok.Data;
import org.springframework.data.annotation.Id;
import org.springframework.data.annotation.Transient;

import javax.persistence.Column;
import java.util.Date;

@Data
@TableName("tb_item")
public class Item {
    @TableId(type = IdType.AUTO)
    @Id
    private Long id;//商品id
    @Column(name = "name")
    private String name;//商品名称
    private String title;//商品标题
    private Long price;//价格(分)
    private String image;//商品图片
    private String category;//分类名称
    private String brand;//品牌名称
    private String spec;//规格
    private Integer status;//商品状态 1-正常,2-下架
    private Date createTime;//创建时间
    private Date updateTime;//更新时间
    @TableField(exist = false)
    @Transient
    private Integer stock;
    @TableField(exist = false)
    @Transient
    private Integer sold;
}(4)编写监听器
通过实现
EntryHandler<T>接口编写监听器,监听 Canal 消息。注意两点 1. 实现类通过
@CanalTable("tb_item")指定监听的表信息 2. EntryHandler 的泛型是与表对应的实体类
java
package com.heima.item.canal;

import com.github.benmanes.caffeine.cache.Cache;
import com.heima.item.config.RedisHandler;
import com.heima.item.pojo.Item;
import org.springframework.beans.factory.annotation.Autowired;
import org.springframework.stereotype.Component;
import top.javatool.canal.client.annotation.CanalTable;
import top.javatool.canal.client.handler.EntryHandler;

@CanalTable("tb_item")
@Component
public class ItemHandler implements EntryHandler<Item> {

    @Autowired
    private RedisHandler redisHandler;
    @Autowired
    private Cache<Long, Item> itemCache;

    @Override
    public void insert(Item item) {
        // 写数据到JVM进程缓存
        itemCache.put(item.getId(), item);
        // 写数据到redis
        redisHandler.saveItem(item);
    }

    @Override
    public void update(Item before, Item after) {
        // 写数据到JVM进程缓存
        itemCache.put(after.getId(), after);
        // 写数据到redis
        redisHandler.saveItem(after);
    }

    @Override
    public void delete(Item item) {
        // 删除数据到JVM进程缓存
        itemCache.invalidate(item.getId());
        // 删除数据到redis
        redisHandler.deleteItemById(item.getId());
    }
}对 Redis 的操作都封装到了 RedisHandler 这个对象中,是我们之前做缓存预热时编写的一个类
java
package com.heima.item.config;

import com.fasterxml.jackson.core.JsonProcessingException;
import com.fasterxml.jackson.databind.ObjectMapper;
import com.heima.item.pojo.Item;
import com.heima.item.pojo.ItemStock;
import com.heima.item.service.IItemService;
import com.heima.item.service.IItemStockService;
import org.springframework.beans.factory.InitializingBean;
import org.springframework.beans.factory.annotation.Autowired;
import org.springframework.data.redis.core.StringRedisTemplate;
import org.springframework.stereotype.Component;

import java.util.List;

@Component
public class RedisHandler implements InitializingBean {

    @Autowired
    private StringRedisTemplate redisTemplate;

    @Autowired
    private IItemService itemService;
    @Autowired
    private IItemStockService stockService;

    private static final ObjectMapper MAPPER = new ObjectMapper();

    @Override
    public void afterPropertiesSet() throws Exception {
        // 初始化缓存
        // 1.查询商品信息
        List<Item> itemList = itemService.list();
        // 2.放入缓存
        for (Item item : itemList) {
            // 2.1.item序列化为JSON
            String json = MAPPER.writeValueAsString(item);
            // 2.2.存入redis
            redisTemplate.opsForValue().set("item:id:" + item.getId(), json);
        }

        // 3.查询商品库存信息
        List<ItemStock> stockList = stockService.list();
        // 4.放入缓存
        for (ItemStock stock : stockList) {
            // 2.1.item序列化为JSON
            String json = MAPPER.writeValueAsString(stock);
            // 2.2.存入redis
            redisTemplate.opsForValue().set("item:stock:id:" + stock.getId(), json);
        }
    }

    public void saveItem(Item item) {
        try {
            String json = MAPPER.writeValueAsString(item);
            redisTemplate.opsForValue().set("item:id:" + item.getId(), json);
        } catch (JsonProcessingException e) {
            throw new RuntimeException(e);
        }
    }

    public void deleteItemById(Long id) {
        redisTemplate.delete("item:id:" + id);
    }
}