
部门管理
查询部门
思路分析
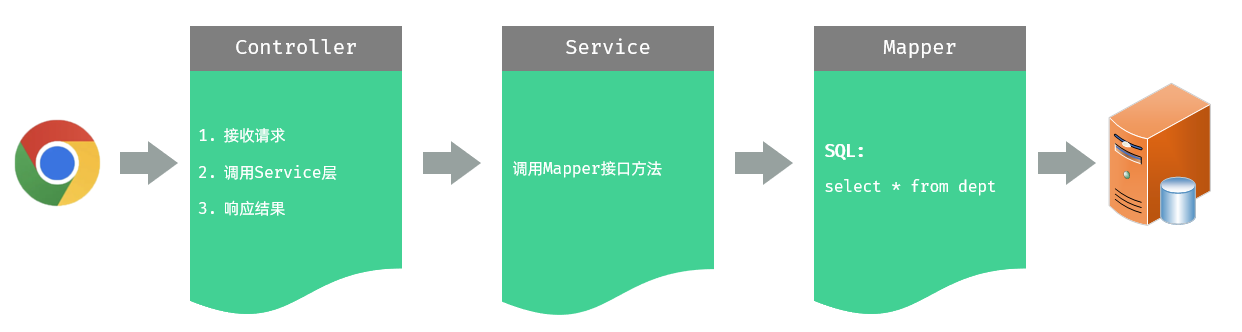
Controller 层,负责接收前端发起的请求,并调用 service 查询部门数据,然后响应结果
Service 层,负责调用 Mapper 接口方法,查询所有部门数据
Mapper 层,执行查询所有部门数据的操作
限制请求方式
问题分析
根据接口文档需求,以 GET 的方式请求,后端成功返回数据,但是经过测试,post、put、delete 请求方式均可成功发送请求并获取后端的响应数据,这时需要限制请求方式
@RequestMapping 的衍生注解
GET 方式:@GetMapping
POST 方式:@PostMapping
PUT 方式: @PutMapping
DELETE 方式:@DeleteMapping
方法一:在 controller 方法的 @RequestMapping 注解中通过 method 属性来限定
指定 value 属性为接口文档中指定的请求路径
java
package com.jacksonling.controller;

import com.jacksonling.pojo.Dept;
import com.jacksonling.pojo.Result;
import com.jacksonling.service.DeptService;
import org.springframework.beans.factory.annotation.Autowired;
import org.springframework.web.bind.annotation.RequestMapping;
import org.springframework.web.bind.annotation.RequestMethod;
import org.springframework.web.bind.annotation.RestController;

import java.util.List;

/**
 * 部门管理控制层
 */
@RestController
public class DeptController {
    @Autowired
    private DeptService deptService;
    @RequestMapping(value = "/depts", method = RequestMethod.GET)
    // 统一响应的结果封装类 Result
    public Result list(){
        List<Dept> deptList = deptService.findAll();
        return Result.success(deptList);
    }
}⭐ 方法二:在 controller 方法上使用,@RequestMapping 的衍生注解,该注解制定了请求方式(推荐)
java
package com.jacksonling.controller;

import com.jacksonling.pojo.Dept;
import com.jacksonling.pojo.Result;
import com.jacksonling.service.DeptService;
import org.springframework.beans.factory.annotation.Autowired;
import org.springframework.web.bind.annotation.GetMapping;
import org.springframework.web.bind.annotation.RestController;

import java.util.List;

/**
 * 部门管理控制层
 */
@RestController
public class DeptController {
    @Autowired
    private DeptService deptService;
    @GetMapping("/depts")
    // 统一响应的结果封装类 Result
    public Result list(){
        List<Dept> deptList = deptService.findAll();
        return Result.success(deptList);
    }
}数据封装
在上述测试中,我们发现部门的数据中,id、name 两个属性是有值的,但是 createTime、updateTime 两个字段值并未成功封装,而数据库中是有对应的字段值的,这是为什么呢?
(1) 实体类 属性名 和数据库表查询返回的 字段名 一致,mybatis 会自动封装
(2) 如果实体类属性名和数据库表查询返回的字段名不一致,不能自动封装
提示:字段名指的是数据库中字段的名称,属性名指的是封装对象中的属性名
方法一:在 DeptMapper 接口方法上,使用 @Results @Result 注解进行手动结果映射
java
@Results({@Result(column = "create_time", property = "createTime"),
          @Result(column = "update_time", property = "updateTime")})
@Select("select id, name, create_time, update_time from dept")
public List<Dept> findAll();方法二:起别名
java
@Select("select id, name, create_time createTime, update_time updateTime from dept")
public List<Dept> findAll();⭐ 方法三:开启驼峰命名(推荐)
使用前提:实体类的属性与数据库表中的字段名严格遵守驼峰命名
在 application.yml 中添加如下配置,快捷键:camel
yml
mybatis:
  configuration:
map-underscore-to-camel-case: true安装 Nginx
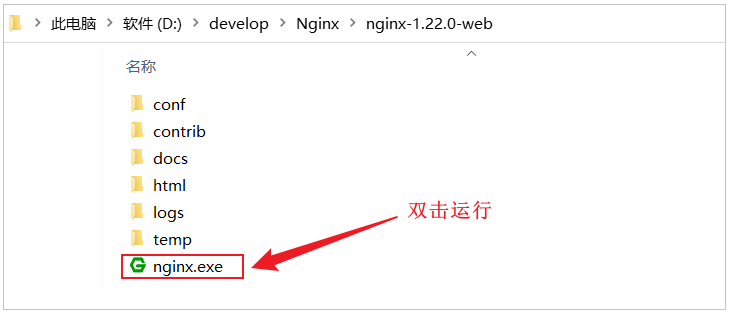
打开浏览器,访问:http://localhost:90

Nginx 请求访问流程
前端工程请求服务器的地址为
http://localhost:90/api/depts,是如何访问到后端的 tomcat 服务器的?
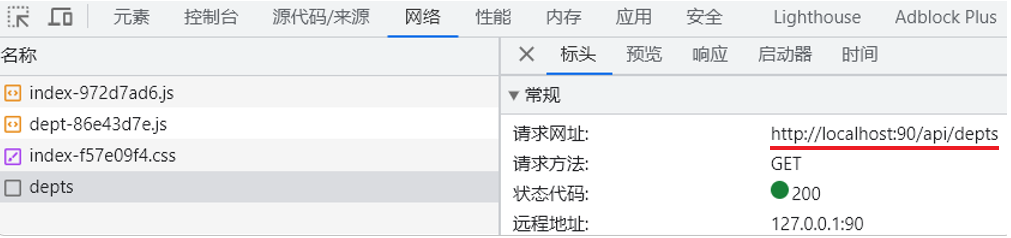
其实这里,是通过前端服务 Nginx 中提供的反向代理功能实现的
(1)浏览器发起请求,请求的是 localhost:90 ,那其实请求的是 nginx 服务器
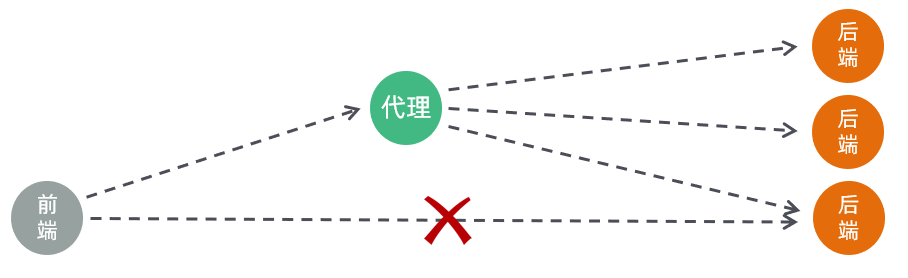
(2)在 nginx 服务器中呢,并没有对请求直接进行处理,而是将请求转发给了后端的 tomcat 服务器,最终由 tomcat 服务器来处理该请求
这个过程就是通过 nginx 的反向代理实现的。 那为什么浏览器不直接请求后端的 tomcat 服务器,而是直接请求 nginx 服务器呢,主要有以下几点原因
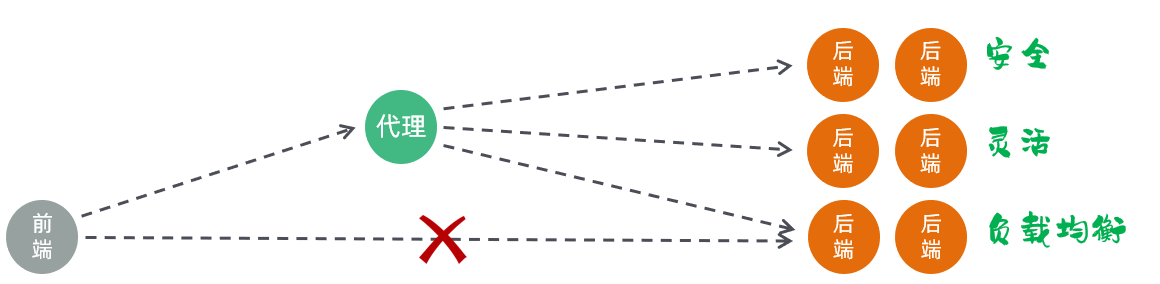
(1)安全:由于后端的 tomcat 服务器一般都会搭建集群,会有很多的服务器,把所有的 tomcat 暴露给前端,让前端直接请求 tomcat,对于后端服务器是比较危险的
(2)灵活:基于 nginx 的反向代理实现,更加灵活,后端想增加、减少服务器,对于前端来说是无感知的,只需要在 nginx 中配置即可
(3)负载均衡:基于 nginx 的反向代理,可以很方便的实现后端 tomcat 的负载均衡操作
具体的请求访问流程如下
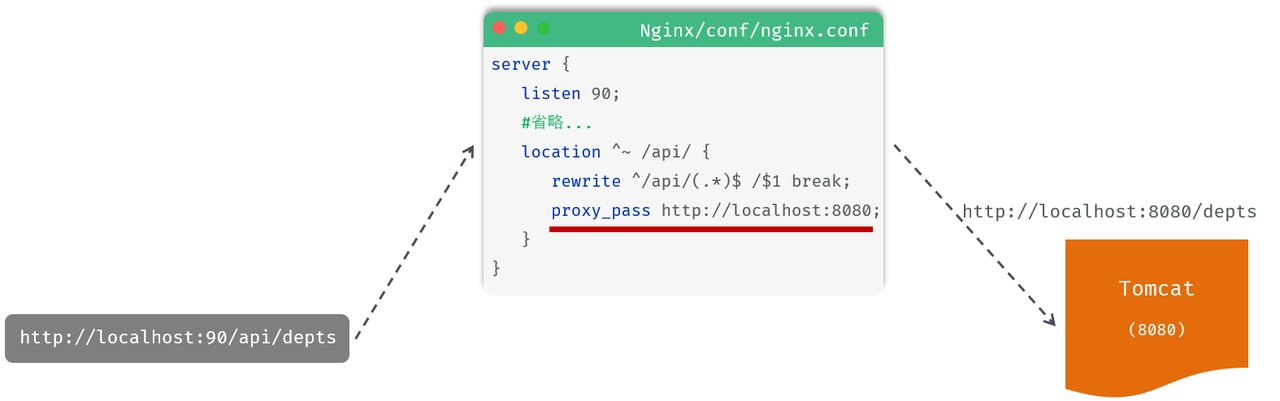
(1)location:用于定义匹配特定 url 请求的规则
(2)^~ /api/:表示精确匹配,即只匹配以 / api / 开头的路径
(3)rewrite:该指令用于重写匹配到的 url 路径
(4)proxy_pass:该指令用于代理转发,它将匹配到的请求转发给位于后端的指令服务器
代码实现
(1)Controller 层
在 DeptController 中,增加 list 方法,代码如下
java
/**
 * 部门管理控制器
 */
@RestController
public class DeptController {

    @Autowired
    private DeptService deptService;

    /**
     * 查询部门列表
     */
    @RequestMapping("/depts")
    public Result list(){
        List<Dept> deptList = deptService.findAll();
        return Result.success(deptList);
    }
}(2) Service 层
在 DeptService 中,增加 findAll 方法,代码如下
java
public interface DeptService {
    /**
     * 查询所有部门
     */
    public List<Dept> findAll();
}在 DeptServiceImpl 中,增加 findAll 方法,代码如下
java
@Service
public class DeptServiceImpl implements DeptService {

    @Autowired
    private DeptMapper deptMapper;

    public List<Dept> findAll() {
        return deptMapper.findAll();
    }
}(3) Mapper 层
在 DeptMapper 中,增加 findAll 方法,代码如下
java
@Mapper
public interface DeptMapper {
    /**
     * 查询所有部门
     */
    @Select("select * from dept")
    public List<Dept> findAll();

}删除部门
思路分析
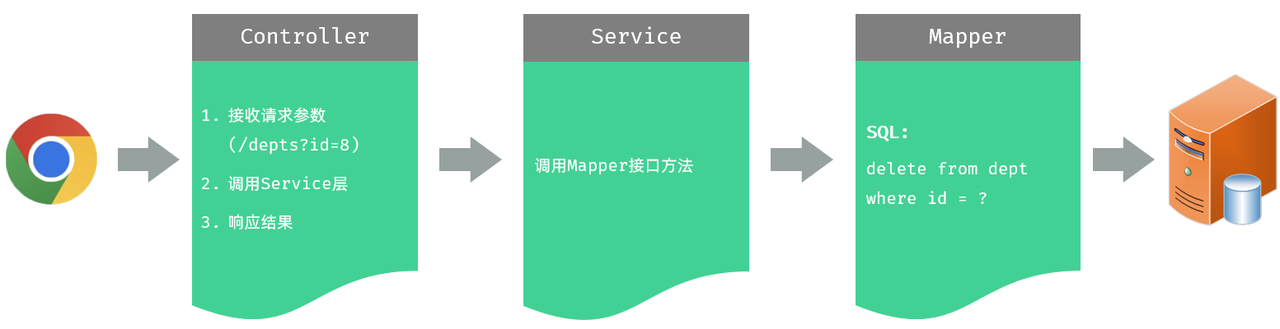
接收请求参数的方法
方法一:通过原始的 HttpServletRequest 对象获取请求参数
java
/**
* 根据ID删除部门 - 简单参数接收: 方式一 (HttpServletRequest)
*/
@DeleteMapping("/depts")
public Result delete(HttpServletRequest request){
    String idStr = request.getParameter("id");
    int id = Integer.parseInt(idStr);

    System.out.println("根据ID删除部门: " + id);
    return Result.success();
}方案二:通过 Spring 提供的 @RequestParam 注解,将请求参数绑定给方法形参
⚠️ 注意点
(1)@RequestParam 注解的 value 属性,需要 与前端传递的参数名保持一致
(2)@RequestParam 注解 required 属性默认为 true,代表该参数 必须传递,如果 不传递将报错。 如果参数可选,可以将属性设置为 false
(3)@RequestParam(value = "id", required = false) Integer deptId
(4)@RequestParam(defaultValue="默认值"),defaultValue 属性可用于设置请求参数默认值
java
@DeleteMapping("/depts")
public Result delete(@RequestParam("id") Integer deptId){
    System.out.println("根据ID删除部门: " + deptId);
    return Result.success();
}方案三:如果请求参数名与形参变量名相同,直接定义方法形参即可接收(省略 @RequestParam)
java
@DeleteMapping("/depts")
public Result delete(Integer id){
    System.out.println("根据ID删除部门: " + deptId);
    return Result.success();
}代码实现
(1)Controller 层
在 DeptMapper 中,增加 delete 方法,代码实现如下
java
/**
 * 根据id删除部门 - delete http://localhost:8080/depts?id=1
 */
@DeleteMapping("/depts")
public Result delete(Integer id){
    System.out.println("根据id删除部门, id=" + id);
    deptService.deleteById(id);
    return Result.success();
}(2)Service 层
在 DeptService 中,增加 deleteById 方法,代码实现如下
java
/**
 * 根据id删除部门
 */
void deleteById(Integer id);在 DeptServiceImpl 中,增加 deleteById 方法,代码实现如下
java
public void deleteById(Integer id) {
    deptMapper.deleteById(id);
}(3)Mapper 层
⚠️ 如果 mapper 接口方法形参只有一个普通类型的参数,#{…} 里面的属性名可以随便写,如:#{id}、#
⚠️ 如果有多个参数,需要使用 @Parm 注解指定参数名,具体见 MyBatis 笔记中 select 的相关笔记
在 DeptMapper 中,增加 deleteById 方法,代码实现如下
java
/**
 * 根据id删除部门
 */
@Delete("delete from dept where id = #{id}")
void deleteById(Integer id);新增部门
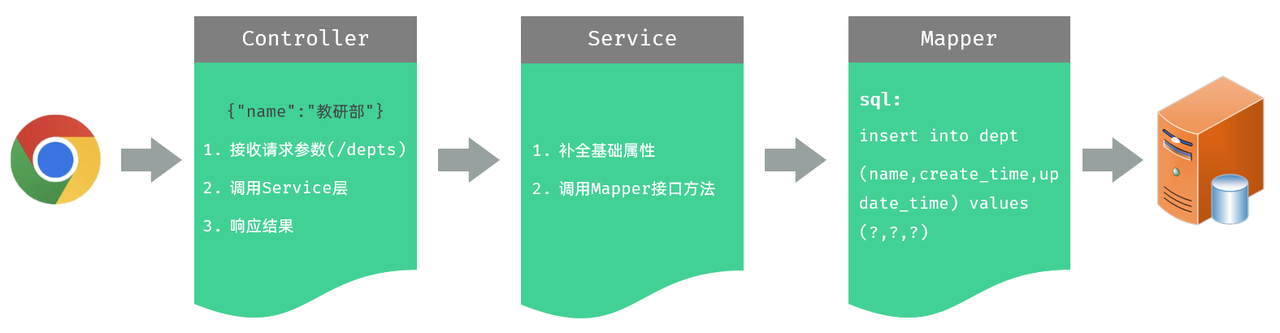
思路分析
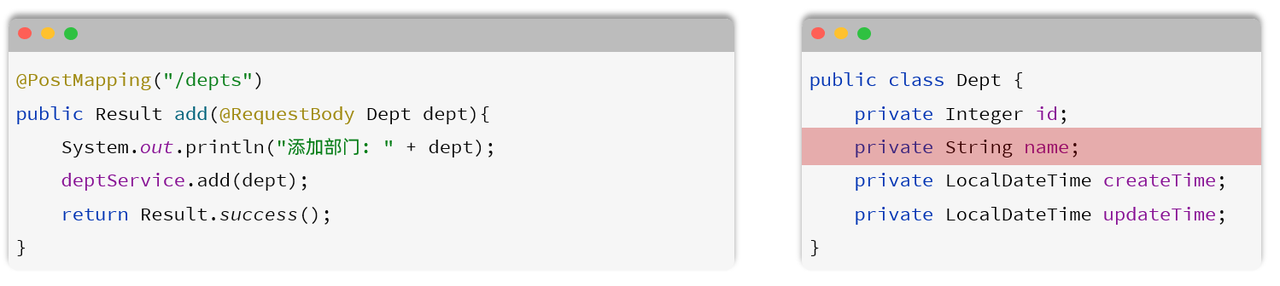
接收 json 数据的方法
我们看到,在 controller 中,需要接收前端传递的请求参数,那接下来,我们就先来看看在服务器端的 Controller 程序中,如何获取 json 格式的参数
(1)JSON 格式的参数,通常会使用一个实体对象进行接收
(2)⚠️ 使用规则:JSON 数据的键名与方法形参对象的属性名相同,并需要使用 @RequestBody 注解标识
(3)理解记忆:@RequestBody 翻译为请求体,然而 JSON 数据就是在请求体中,然后发送给后端的
前端传递的请求参数格式为 json,内容如下:{"name":"研发部"},这里,我们可以通过一个对象来接收,只需要保证对象中有 name 属性即可
代码实现
(1) Controller 层
在 DeptController 中增加方法 save,具体代码如下
java
/**
 * 新增部门 - POST http://localhost:8080/depts   请求参数:{"name":"研发部"}
 */
@PostMapping("/depts")
public Result save(@RequestBody Dept dept){
    System.out.println("新增部门, dept=" + dept);
    deptService.save(dept);
    return Result.success();
}(2) Service 层
在 DeptService 中增加接口方法 save,具体代码如下
java
/**
 * 新增部门
 */
void save(Dept dept);在 DeptServiceImpl 中增加 save 方法,由于数据库中含有时间字段,这里需要在业务层手动设置然后传给 Mapper 层,完成添加部门的操作,具体代码如下
java
public void save(Dept dept) {
    //补全基础属性
    dept.setCreateTime(LocalDateTime.now());
    dept.setUpdateTime(LocalDateTime.now());
    //保存部门
    deptMapper.insert(dept);
}(3)Mapper 层
java
/**
 * 保存部门
 */
@Insert("insert into dept(name,create_time,update_time) values(#{name},#{createTime},#{updateTime})")
void insert(Dept dept);修改部门
思路分析
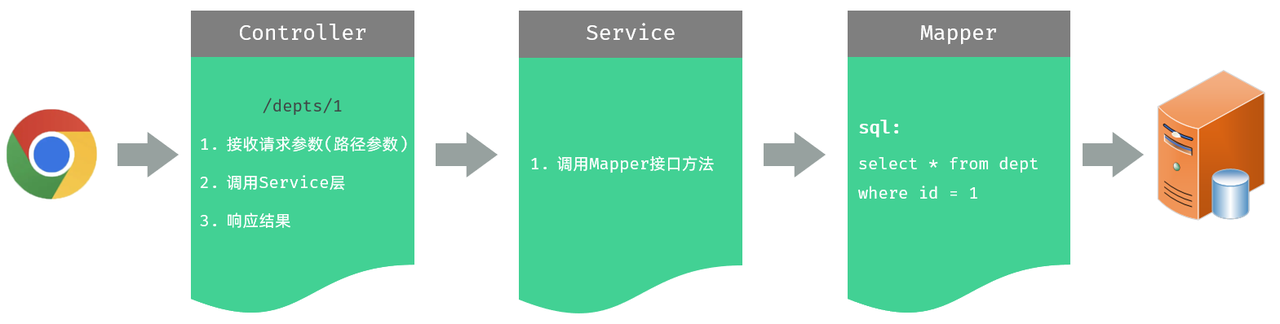
一、查询回显模块
接收路径参数
/depts/1,/depts/2 这种在 url 中传递的参数,我们称之为路径参数,那么如何接收这样的路径参数呢 ?
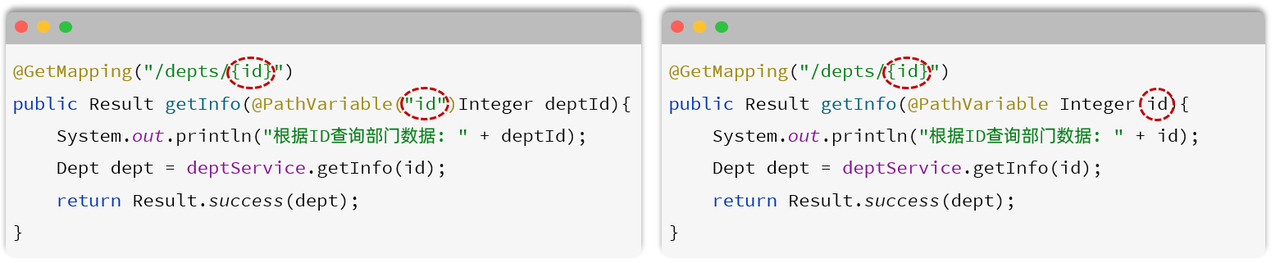
路径参数:通过请求 URL 直接传递参数,使用 {…} 来标识该路径参数,需要使用 @PathVariable 获取路径参数
⚠️ 如果路径参数名与 controller 方法形参名称一致,@PathVariable 注解的 value 属性是可以省略的
代码实现
(1)Controller 层
在 DeptController 中增加 getById 方法,具体代码如下
java
@GetMapping("/depts/{id}")
public Result getById(@PathVariable Integer id){
    System.out.println("根据ID查询, id=" + id);
    Dept dept = deptService.getById(id);
    return Result.success(dept);
}(2) Service 层
在 DeptService 中增加 getById 方法,具体代码如下
java
/**
 * 根据id查询部门
 */
Dept getById(Integer id);在 DeptServiceImpl 中增加 getById 方法,具体代码如下
java
public Dept getById(Integer id) {
    return deptMapper.getById(id);
}(3)Mapper 层
在 DeptMapper 中增加 getById 方法,具体代码如下
java
/**
* 根据ID查询部门数据
*/
@Select("select id, name, create_time, update_time from dept where id = #{id}")
Dept getById(Integer id);二、修改数据模块
思路分析
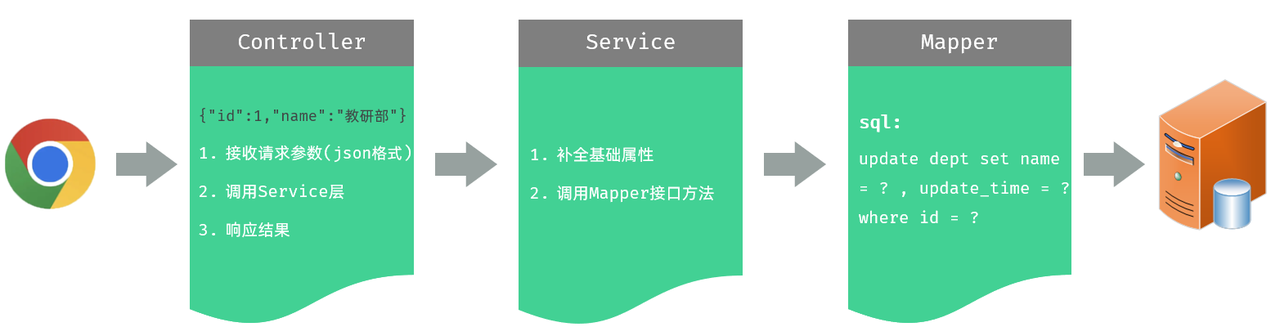
通过接口文档,我们可以看到前端传递的请求参数是 json 格式的请求参数,在 Controller 的方法中,我们可以通过 @RequestBody 注解来接收,并将其封装到一个对象中
代码实现
(1)Controller 层
在 DeptController 中增加 update 方法,具体代码如下
java
/**
 * 修改部门 - PUT http://localhost:8080/depts  请求参数:{"id":1,"name":"研发部"}
 */
@PutMapping("/depts")
public Result update(@RequestBody Dept dept){
    System.out.println("修改部门, dept=" + dept);
    deptService.update(dept);
    return Result.success();
}(2)Service 层
在 DeptService 中增加 update 方法
java
/**
 * 修改部门
 */
void update(Dept dept);在 DeptServiceImpl 中增加 update 方法。 由于是修改操作,每一次修改数据,都需要更新 updateTime。所以,具体代码如下
java
public void update(Dept dept) {
    //补全基础属性
    dept.setUpdateTime(LocalDateTime.now());
    //保存部门
    deptMapper.update(dept);
}(3)Mapper 层
在 DeptMapper 中增加 update 方法,具体代码如下
java
/**
 * 更新部门
 */
@Update("update dept set name = #{name},update_time = #{updateTime} where id = #{id}")
void update(Dept dept);优化请求路径写法
我们会发现,我们在 DeptController 中所定义的方法,所有的请求路径,都是 /depts 开头的,只要操作的是部门数据,请求路径都是 /depts 开头
那么这个时候,我们其实是可以把这个公共的路径 /depts 抽取到类上的,那在各个方法上,就可以省略了这个 /depts 路径。 代码如下

⚠️ 一个完整的请求路径,应该是类上的 @RequestMapping 的 value 属性 + 方法上的 @RequestMapping 的 value 属性