
FastAPI 使用
官方文档
https://fastapi.tiangolo.com/zh/
快速开始
安装依赖
bash
pip install "fastapi[standard]"示例代码
项目启动后,访问
http://localhost:8000/docs可查看接口文档 常用请求方式:@app.get()、@app.post()、@app.put()、@app.delete()
Path 函数:实现路径参数校验,主要参数包括
...表示必填参数,gt表示大于,lt表示小于,description表示参数描述,min_length表示最小长度,max_length表示最大长度 Query 函数:实现查询参数校验,主要参数和 Path 函数一样
python
from fastapi import FastAPI

app = FastAPI() # 创建实例

app.mount("/static", StaticFiles(directory="static"), name="static") # 挂载静态文件的存放目录

# 访问根路径:http://localhost:8000/
@app.get("/")
async def root():
    return {"message": "Hello World"}

@app.get("/book/{id}") # 异步方式,可以用 Path 函数实现参数校验
async def get_book(id: int = Path(..., gt=0, lt=101, description="书籍id,取值范围1-100")):
    return {"id": id, "title": f"这是第{id}本书"}

@app.get("/news/news_list") # Query 函数,指定查询参数
async def get_news_list(
    skip: int = Query(0, description="跳过的记录数", lt=100),
    limit: int = Query(10, description="返回的记录数")
):
    return {"skip": skip, "limit": limit}

# 启动项目
if __name__ == "__main__":
    import uvicorn
    uvicorn.run(app, host="0.0.0.0", port=8000)

# 命令行方式启动:uvicorn main:app --reload
# main 是文件名,可替换,reload 表示修改代码后自动重启服务请求体
继承 BaseModel 类实现请求体定义
Field 函数:实现请求体参数校验,主要参数包括
default默认值,min_length最小长度,max_length最大长度,description参数描述,gt大于,lt小于
python
# 注册: 用户名和密码 → str
class User(BaseModel):
    username: str = Field(default="张三", min_length=2, max_length=10, description="用户名,长度要求2-10个字")
    password: str = Field(min_length=3, max_length=20)


@app.post("/register")
async def register(user: User):
return user响应体
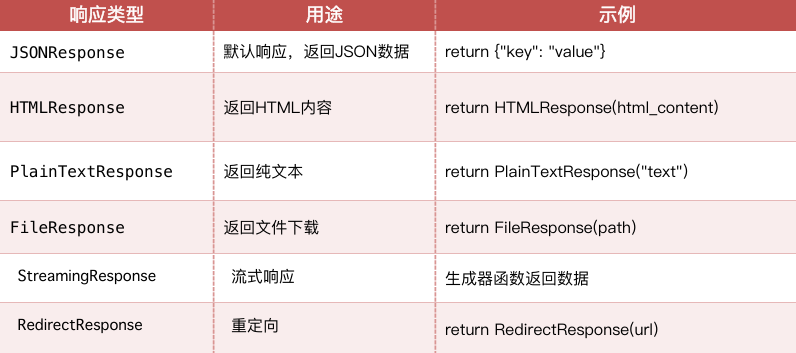
通过 response_class 参数来指定响应体的类型
继承 BaseModel 实现自定义响应体,通过 response_model 参数来指定自定义响应体类型
python
# JSONResponse,默认格式
@app.get("/")
async def root():
    return {"message": "Hello World"}

# HTMLResponse
@app.get("/html", response_class=HTMLResponse)
async def get_html():
    return "<h1>这是一级标题</h1>"

# FileResponse
@app.get("/file")
async def get_file():
    path = "./files/1.jpeg"
    return FileResponse(path)

# 自定义响应体
class News(BaseModel):
    id: int
    title: str
    content: str

# 方式一:使用对象模型,通过 response_model 参数指定自定义响应体类型
@app.get("/news/{id}", response_model=News)
async def get_news(id: int):
    return News(
        id=id,
        title=f"这是第{id}本书",
        content="这是一本好书"
    )

# 方式二:通过 json 格式赋值,并通过类型注解定义类型,这里也可以采用对象模型
@app.get("/news/{id}")
async def get_news(id: int) -> News:
    return {
        "id": id,
        "title": f"这是第{id}本书",
        "content": "这是一本好书"
}异常处理
python
# 方式一:抛出异常
@app.get("/news/{id}")
async def get_news(id: int):
    id_list = [1, 2, 3, 4, 5, 6]
    if id not in id_list:
        raise HTTPException(status_code=404, detail="您查找的新闻不存在")  # 这里增加缩进(4个空格)
    return {"id": id}

# 方式二:定义全局异常处理器 exception_handler
@app.exception_handler(Exception)
def handle_exception(request: Request, exc: Exception):
return JSONResponse(content={"code": 500, "message": "服务器内部错误, 请联系管理员~", "data": None})日志打印
python
import logging

# 配置日志的基本信息
# %(asctime)s :  时间 ;  %(levelname)s: 日志级别; %(filename)s: 文件名; %(lineno)d: 行数;  %(message)s: 日志信息
logging.basicConfig(
    level=logging.ERROR,  # 日志级别
    format="%(asctime)s - %(levelname)s - %(filename)s:%(lineno)d - %(message)s" # 日志格式
)

# 异常处理器, 捕获所有异常 ---> 返回的对象的类型得是 Response
@app.exception_handler(Exception)
def handle_exception(request: Request, exc: Exception):
    logging.error(f"处理异常, 请求路径: {request.url},  捕获到异常: {exc}")
return JSONResponse(content={"code": 500, "message": "服务器内部错误, 请联系管理员~", "data": None})中间件
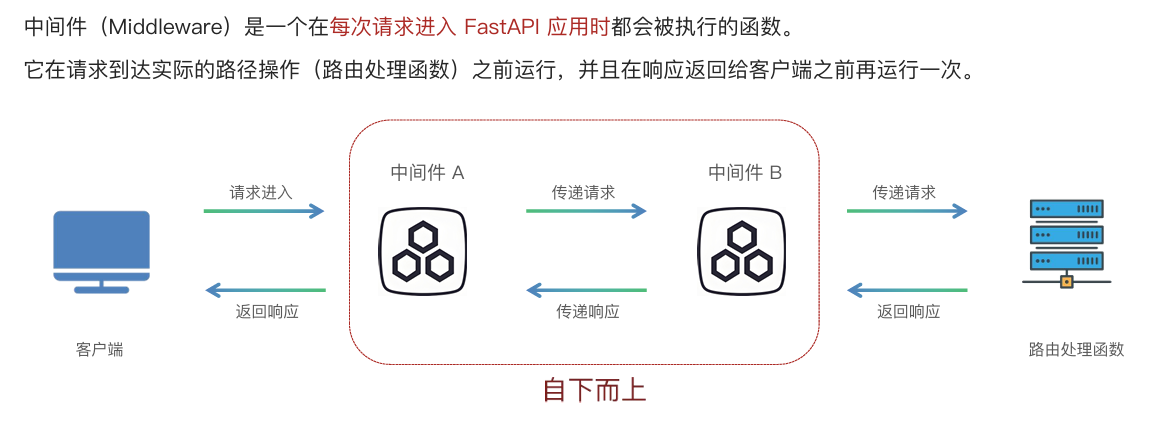
中间件可以为每个请求添加同意的处理逻辑,如记录日志,身份认证,跨域,设置响应头,性能监控等,执行顺序为自下而上
定义方式:在函数的顶部使用装饰器 @app.middleware("http")
python
@app.middleware("http")
async def middleware2(request, call_next):
    print("中间件2 start")
    response = await call_next(request)
    print("中间件2 end")
    return response


@app.middleware("http")
async def middleware1(request, call_next):
    print("中间件1 start")
    response = await call_next(request)
    print("中间件1 end")
    return response

"""
执行顺序自下而上,即执行结果如下

中间件1 start
中间件2 start
中间件2 end
中间件1 end
"""依赖注入
依赖项:可重用的组件(函数/类),负责提供某种功能或数据
依赖注入可以实现抽取可复用的组件,实现代码复用、解耦且可轻松替换依赖项进行测试
使用场景:处理请求参数,共享业务逻辑,共享数据库连接,安全和验证
使用步骤:创建依赖项 -> 导入 Depends -> 声明依赖项
python
from fastapi import FastAPI, Query, Depends  # 2. 导入 Depends

app = FastAPI()

@app.get("/")
async def root():
    return {"message": "Hello World"}

# 分页参数逻辑共用: 新闻列表和用户列表
# 定义依赖项
async def common_parameters(
    skip: int = Query(0, ge=0),
    limit: int = Query(10, le=60)
):
    return {"skip": skip, "limit": limit}

# 依赖注入
@app.get("/news/news_list")
async def get_news_list(commons=Depends(common_parameters)):
return commonsORM 操作
基本介绍
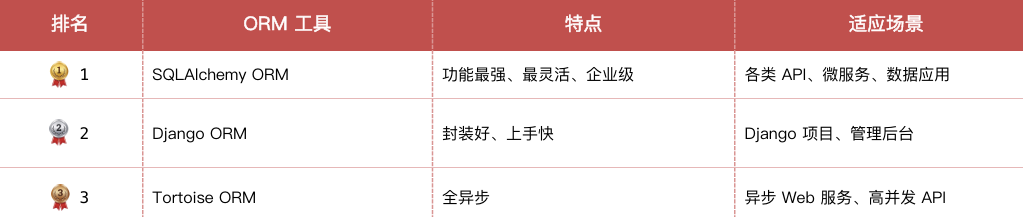
ORM(Object-RelationalMapping,对象关系映射)是一种编程技术,用于在面向对象编程语言和关系型数据库之间建立映射。它允许开发者通过操作对象的方式与数据库进行交互,而无需直接编写复杂的 SQL 语句
使用 ORM 可以实现减少重复的 SQL 代码、代码更简洁易读、自动处理数据库连接和事务、自动防止 SQL 注入攻击
建表操作
FastAPI 应用启动时实现创建数据库表
通过继承 DeclarativeBase 实现创建表模型,Mapped 字段声明数据库字段类型,mapped_column 函数声明数据库字段的属性
python
from datetime import datetime
from fastapi import FastAPI, Depends
from sqlalchemy import DateTime, func, String, Float, select
from sqlalchemy.ext.asyncio import create_async_engine, async_sessionmaker, AsyncSession
from sqlalchemy.orm import DeclarativeBase, Mapped, mapped_column

app = FastAPI()

# 1. 创建异步引擎
ASYNC_DATABASE_URL = "mysql+aiomysql://root:123456@localhost:3306/FastAPI_first?charset=utf8"
async_engine = create_async_engine(
    ASYNC_DATABASE_URL,
    echo=True,  # 可选,输出 SQL 日志
    pool_size=10,  # 设置连接池活跃的连接数
    max_overflow=20  # 允许额外的连接数
)

# 2. 定义模型类: 基类 + 表对应的模型类
# 基类:创建时间、更新时间;书籍表:id、书名、作者、价格、出版社
class Base(DeclarativeBase):
    created_at: Mapped[datetime] = mapped_column(
        DateTime,
        default=datetime.now,
        comment="创建时间"
    )
    updated_at: Mapped[datetime] = mapped_column(
        DateTime,
        default=datetime.now,
        onupdate=datetime.now,
        comment="更新时间"
    )


class News(Base):
    __tablename__ = "news"

    # 创建索引:提升查询速度 → 添加目录
    __table_args__ = (
        Index('fk_news_category_idx', 'category_id'),  # 高频查询场景
        Index('idx_publish_time', 'publish_time')  # 按发布时间排序
    )

    id: Mapped[int] = mapped_column(Integer, primary_key=True, autoincrement=True, comment="新闻ID")
    title: Mapped[str] = mapped_column(String(255), nullable=False, comment="新闻标题")
    description: Mapped[Optional[str]] = mapped_column(String(500), comment="新闻简介")
    content: Mapped[str] = mapped_column(Text, nullable=False, comment="新闻内容")
    image: Mapped[Optional[str]] = mapped_column(String(255), comment="封面图片URL")
    author: Mapped[Optional[str]] = mapped_column(String(50), comment="作者")
    category_id: Mapped[int] = mapped_column(Integer, ForeignKey('news_category.id'), nullable=False, comment="分类ID")
    views: Mapped[int] = mapped_column(Integer, default=0, nullable=False, comment="浏览量")
    publish_time: Mapped[datetime] = mapped_column(DateTime, default=datetime.now, comment="发布时间")

    def __repr__(self): # 类似 Java 中的 toString 方法
        return f"<News(id={self.id}, title='{self.title}', views={self.views})>"

# 3. 建表:定义函数建表 → FastAPI 启动的时候调用建表的函数
async def create_tables():
    # 获取异步引擎,创建事务 - 建表
    async with async_engine.begin() as conn:
        await conn.run_sync(Base.metadata.create_all)  # Base 模型类的元数据创建

@app.on_event("startup")
async def startup_event():
    await create_tables()

@app.get("/")
async def root():
return {"message": "Hello World"}示例代码
python
from datetime import datetime
from fastapi import FastAPI, Depends
from sqlalchemy import DateTime, func, String, Float, select
from sqlalchemy.ext.asyncio import create_async_engine, async_sessionmaker, AsyncSession
from sqlalchemy.orm import DeclarativeBase, Mapped, mapped_column

app = FastAPI()

# 1. 创建异步引擎
ASYNC_DATABASE_URL = "mysql+aiomysql://root:123456@localhost:3306/FastAPI_first?charset=utf8"
async_engine = create_async_engine(
    ASYNC_DATABASE_URL,
    echo=True,  # 可选,输出 SQL 日志
    pool_size=10,  # 设置连接池活跃的连接数
    max_overflow=20  # 允许额外的连接数
)

# 2. 定义模型类: 基类 + 表对应的模型类
# 基类:创建时间、更新时间;书籍表:id、书名、作者、价格、出版社
class Base(DeclarativeBase):
    create_time: Mapped[datetime] = mapped_column(DateTime, insert_default=func.now(), default=func.now, comment="创建时间")
    update_time: Mapped[datetime] = mapped_column(DateTime, insert_default=func.now(), default=func.now, onupdate=func.now(), comment="修改时间")


class Book(Base):
    __tablename__ = "book"

    id: Mapped[int] = mapped_column(primary_key=True, comment="书籍id")
    bookname: Mapped[str] = mapped_column(String(255), comment="书名")
    author: Mapped[str] = mapped_column(String(255), comment="作者")
    price: Mapped[float] = mapped_column(Float, comment="价格")
    publisher: Mapped[str] = mapped_column(String(255), comment="出版社")

# 3. 建表:定义函数建表 → FastAPI 启动的时候调用建表的函数
async def create_tables():
    # 获取异步引擎,创建事务 - 建表
    async with async_engine.begin() as conn:
        await conn.run_sync(Base.metadata.create_all)  # Base 模型类的元数据创建

@app.on_event("startup")
async def startup_event():
    await create_tables()

@app.get("/")
async def root():
    return {"message": "Hello World"}

# 需求:查询功能的接口,查询图书 → 依赖注入:创建依赖项获取数据库会话 + Depends 注入路由处理函数
AsyncSessionLocal = async_sessionmaker(
    bind=async_engine,  # 绑定数据库引擎
    class_=AsyncSession,  # 指定会话类
    expire_on_commit=False  # 提交后会话不过期,不会重新查询数据库
)

# 依赖项
async def get_database():
    async with AsyncSessionLocal() as session:
        try:
            yield session  # 返回数据库会话给路由处理函数
            await session.commit()  # 提交事务
        except Exception:
            await session.rollback()  # 有异常,回滚
            raise
        finally:
            await session.close()  # 关闭会话

@app.get("/book/books")
async def get_book_list(db: AsyncSession = Depends(get_database)):
    # 查询
    result = await db.execute(select(Book))
    book = result.scalars().all()
return bookCRUD 操作
普通查询
python
@app.get("/book/books")
async def get_book_list(db: AsyncSession = Depends(get_database)):
    result = await db.execute(select(Book))  # 查询 → 返回一个 ORM 对象
    book = result.scalars().all()  # 获取所有数据
    book = result.scalars().first()  # 获取第一个数据
    book = await db.get(Book, 5)  # 根据主键 id 获取单条数据
return book条件查询
python
# 需求:路径参数 书籍id
@app.get("/book/get_book/{book_id}")
async def get_book_list(book_id: int, db: AsyncSession = Depends(get_database)):
    result = await db.execute(select(Book).where(Book.id == book_id))
    book = result.scalar_one_or_none()
    return book

# 需求:条件 价格大于等于200
@app.get("/book/search_book")
async def get_search_book(db: AsyncSession = Depends(get_database)):
    result = await db.execute(select(Book).where(Book.price >= 200))
    books = result.scalars().all()
    return books

@app.get("/book/search_book")
async def get_search_book(db: AsyncSession = Depends(get_database)):
    # 需求: 作者以 曹 开头  % _
    # like() 模糊查询: % 任意个字符;_ 一个单个字符
    result = await db.execute(select(Book).where(Book.author.like("曹_")))

    # & | ~ 与非
    result = await db.execute(select(Book).where((Book.author.like("曹%")) | (Book.price > 100)))

    # in_() 包含
    # 需求:书籍id列表,数据库里面的 id 如果在 书籍id列表里面 就返回
    id_list = [1, 3, 5, 7]
    result = await db.execute(select(Book).where(Book.id.in_(id_list)))
    book = result.scalars().all()
return book聚合查询
python
@app.get("/book/count")
async def get_count(db: AsyncSession = Depends(get_database)):
    # 聚合查询 select( func.方法名(模型类.属性) )
    result = await db.execute(select(func.count(Book.id)))
    result = await db.execute(select(func.max(Book.price)))
    result = await db.execute(select(func.sum(Book.price)))
    result = await db.execute(select(func.avg(Book.price)))
    num = result.scalar()  # 用来提取一个数值 → 标量值
return num分页查询
python
@app.get("/book/get_book_list")
async def get_book_list(
    page: int = 1,
    page_size: int = 3,
    db: AsyncSession = Depends(get_database)
):
    # (页码 - 1) * 每页数量
    skip = (page - 1) * page_size

    # offset 跳过的记录数  ; limit 每页的记录数
    stmt = select(Book).offset(skip).limit(page_size)
    result = await db.execute(stmt)
    books = result.scalars().all()
return books联表查询
python
# 获取收藏列表:获取的是某个用户的收藏列表 + 分页功能
async def get_favorite_list(
        db: AsyncSession,
        user_id: int,
        page: int = 1,
        page_size: int = 10
):
    # 总量 + 收藏的新闻列表
    count_query = select(func.count()).where(Favorite.user_id == user_id)
    count_result = await db.execute(count_query)
    total = count_result.scalar_one()

    # 获取收藏列表 - 联表查询 join() + 收藏时间排序 + 分页
    # select(查询主体模型类, 字段别名).join(联合查询的模型类, 联合查询的条件).where().order_by().offset().limit()
    # 别名: Favorite.created_at.label("favorite_time")
    offset = (page - 1) * page_size
    # [
    #   (新闻对象, 收藏时间, 收藏id)
    # ]
    query = (select(News, Favorite.created_at.label("favorite_time"), Favorite.id.label("favorite_id"))
             .join(Favorite, Favorite.news_id == News.id)
             .where(Favorite.user_id == user_id)
             .order_by(Favorite.created_at.desc())
             .offset(offset).limit(page_size)
             )
    result = await db.execute(query)
    rows = result.all()
return rows, total新增操作
python
# 需求:用户输入图书信息(id、书名、作者、价格、出版社) → 新增
# 用户输入 → 参数 → 请求体
class BookBase(BaseModel):
    id: int
    bookname: str
    author: str
    price: float
    publisher: str

@app.post("/book/add_book")
async def add_book(book: BookBase, db: AsyncSession = Depends(get_database)):
    # ORM对象 → add → commit
    # 获取 book 对象的所有属性,返回一个字典,把字典拆开,变成 key=value 的形式
    # 相当于:Book(id=1, bookname="三体", author="刘慈欣", price=68.0, publisher="重庆出版社")
    book_obj = Book(**book.__dict__)
    db.add(book_obj)
    await db.commit()
return book更新操作
python
# 需求:修改图书信息:先查再改
# 设计思路:路径参数书籍id:作用是查找;请求体参数:作用是新数据(书名、作者、价格、出版社)
class BookUpdate(BaseModel):
    bookname: str
    author: str
    price: float
    publisher: str

# 更新字段
@app.put("/book/update_book/{book_id}")
async def update_book(book_id: int, data: BookUpdate, db: AsyncSession = Depends(get_database)):
    # 1. 查找图书
    db_book = await db.get(Book, book_id)
    # 如果未找到 抛出异常
    if db_book is None:
        raise HTTPException(
            status_code=404,
            detail="查无此书"
        )
    # 2. 找到了则修改:重新赋值
    db_book.bookname = data.bookname
    db_book.author = data.author
    db_book.price = data.price
    db_book.publisher = data.publisher
    # 3. 提交到数据库
    await db.commit()
    return db_book

# 更新值与校验
async def increase_news_views(db: AsyncSession, news_id: int):
    stmt = update(News).where(News.id == news_id).values(views=News.views + 1) # 更新数量
    result = await db.execute(stmt)
    await db.commit()
    # 更新 → 检查数据库是否真的命中了数据 → 命中了返回True
    return result.rowcount > 0

# 更新对象
async def change_password(db: AsyncSession, user: User, old_password: str, new_password: str):
    if not security.verify_password(old_password, user.password):
        return False
    hashed_new_pwd = security.get_hash_password(new_password)
    user.password = hashed_new_pwd
    # 更新: 由SQLAlchemy真正接管这个 User 对象,确保可以 commit
    # 规避 session 过期或关闭导致的不能提交的问题
    db.add(user)
    await db.commit()
    await db.refresh(user)
    return True

# 更新对象写法
async def update_user(db: AsyncSession, username: str, user_data: UserUpdateRequest):
    # update(User).where(User.username == username).values(字段=值, 字段=值)
    # user_data 是一个Pydantic类型,得到字典 → ** 解包
    # 没有设置值的不更新
    query = update(User).where(User.username == username).values(**user_data.model_dump(
        exclude_unset=True,
        exclude_none=True
))删除操作
python
@app.delete("/book/delete_book/{book_id}")
async def delete_book(book_id: int, db: AsyncSession = Depends(get_database)):
    # 先查再删 提交
    db_book = await db.get(Book, book_id)

    if db_book is None:
        raise HTTPException(
            status_code=404,
            detail="查无此书"
        )

    await db.delete(db_book)
    await db.commit()
return {"msg": "删除图书成功"}后端模块
安装依赖
bash
pip install "sqlalchemy[asyncio]" aiomysqlORM 配置
python
from sqlalchemy.ext.asyncio import async_sessionmaker, AsyncSession, create_async_engine

# 数据库URL
ASYNC_DATABASE_URL = "mysql+aiomysql://root:123456@localhost:3306/news_api?charset=utf8mb4"

# 创建异步引擎
async_engine = create_async_engine(
    ASYNC_DATABASE_URL,
    echo=True,  # 可选:输出SQL日志
    pool_size=10,  # 设置连接池中保持的持久连接数
    max_overflow=20  # 设置连接池允许创建的额外连接数
)

# 创建异步会话工厂
AsyncSessionLocal = async_sessionmaker(
    bind=async_engine,
    class_=AsyncSession,
    expire_on_commit=False
)

# 依赖项,用于获取数据库会话
async def get_db():
    async with AsyncSessionLocal() as session:
        try:
            yield session
            await session.commit()
        except Exception:
            await session.rollback()
            raise
        finally:
await session.close()Redis 配置
(1)安装依赖
bash
pip install redis(2)Redis 配置及方法封装
python
import json
from typing import Any
import redis.asyncio as redis

REDIS_HOST = "localhost"
REDIS_PORT = 6379
REDIS_DB = 0

# 创建 Redis 的连接对象
redis_client = redis.Redis(
    host=REDIS_HOST,  # Redis 服务器的主机地址
    port=REDIS_PORT,  # Redis 端口号
    db=REDIS_DB,  # Redis 数据库编号,0~15
    decode_responses=True  # 是否将字节数据解码为字符串
)

# 设置 和 读取(字符串 和 列表或字典)"[{}]"
# 读取:字符串
async def get_cache(key: str):
    # return await redis_client.get(key)
    try:
        return await redis_client.get(key)
    except Exception as e:
        print(f"获取缓存失败:{e}")
        return None

# 读取:列表或字典
async def get_json_cache(key: str):
    try:
        data = await redis_client.get(key)
        if data:
            return json.loads(data)  # 序列化
        return None
    except Exception as e:
        print(f"获取 JSON 缓存失败:{e}")
        return None

# 设置缓存 setex(key, expire, value)
async def set_cache(key: str, value: Any, expire: int = 3600):
    try:
        if isinstance(value, (dict, list)):
            # 转字符串再存
            value = json.dumps(value, ensure_ascii=False)  # 中文正常保存
        await redis_client.setex(key, expire, value)
        return True
    except Exception as e:
        print(f"设置缓存失败:{e}")
return False项目结构
开发流程如下
(1)编写数据库配置类,数据库表模型,util 包工具类设置等基础准备工作
(2)编写接口路由,在 main.py 中完成路由挂载,定义实体模型并实现 CRUD 操作方法,由路由层调用完成接口业务
fastapi_backend/
    ├── crud/                  # 数据库增删改查逻辑(封装数据库操作)
    │   ├── news.py
    │   └── users.py
    │
    ├── models/                # 数据库模型(SQLAlchemy ORM)
    │   ├── news.py
    │   └── users.py
    │
    ├── routers/               # 路由层(按模块划分)
    │   ├── news.py
    │   └── users.py
    │
    ├── schemas/               # 数据验证模型(Pydantic)
    │   ├── news.py
    │   └── users.py
    │
    ├── utils/                 # 工具函数
    │
    ├── config/                # 配置相关
    │   └── db_conf.py
    │
    ├── main.py
    │
└── test_main.http路由挂载
(1)定义路由
python
# 创建 APIRouter 实例
# prefix 路由前缀(API 接口规范文档)
# tags 分组 标签
router = APIRouter(prefix="/api/news", tags=["news"])

# 接口实现流程
# 1. 模块化路由 → API 接口规范文档
# 2. 定义模型类 → 数据库表(数据库设计文档)
# 3. 在 crud 文件夹里面创建文件,封装操作数据库的方法
# 4. 在路由处理函数里面调用 crud 封装好的方法,响应结果
@router.get("/categories")
async def get_categories(skip: int = 0, limit: int = 100, db: AsyncSession = Depends(get_db)):
    # 先获取数据库里面新闻分类数据 → 先定义模型类 → 封装查询数据的方法
    categories = await news.get_categories(db, skip, limit)
    return {
        "code": 200,
        "message": "获取新闻分类成功",
        "data": categories
}(2)main.py 中实现路由挂载
python
# main.py 中实现路由挂载
app.include_router(router)跨域问题
跨域资源共享(CORS)是一种浏览器安全机制,用于允许运行在一个源(Origin)的 Web 应用,通过浏览器向另一个源的服务器发起跨域 HTTP 请求,并在服务器授权的前提下获取资源
跨域判断:协议,域名,端口三个条件一个不同就造成跨域,都相同即为同源
在 main.py 中添加如下代码配置跨域资源共享
python
app.add_middleware(
    CORSMiddleware,
    allow_origins=["*"],     # 允许的源,开发阶段允许所有源,生产环境需要指定源
    allow_credentials=True,  # 允许携带cookie
    allow_methods=["*"],     # 允许的请求方法
    allow_headers=["*"],     # 允许的请求头
)密码加密
安装 passlib 模块:pip install "passlib[bcrypt]==1.7.4",官方长期稳定版本
python
from passlib.context import CryptContext

# 创建密码加密上下文
pwd_context = CryptContext(
    schemes=["bcrypt"],
    deprecated="auto"
)

# 加密
def get_password_hash(password: str) -> str:
    return pwd_context.hash(password)

# 密码校验
def verify_password(plain_password: str, hashed_password: str) -> bool:
return pwd_context.verify(plain_password, hashed_password)响应封装
(1)响应结果封装
python
from fastapi.responses import JSONResponse
from fastapi.encoders import jsonable_encoder

def success_response(message: str = "success", data=None):
    content = {
        "code": 200,
        "message": message,
        "data": data
    }
    # 目标:把任何的 FastAPI、Pydantic、ORM 对象 都要正常响应 → code、message、data
return JSONResponse(content=jsonable_encoder(content))(2)调用示例
python
# data 数据类型
class UserAuthResponse(BaseModel):
    token: str
    user_info: UserInfoResponse = Field(..., alias="userInfo")

    # 模型类配置
    model_config = ConfigDict(
        populate_by_name=True,  # alias / 字段名兼容
        from_attributes=True  # 允许从 ORM 对象属性中取值
    )

@router.post("/register")
async def register(user_data: UserRequest, db: AsyncSession = Depends(get_db)):  # 用户信息 和 db
    # 注册逻辑:验证用户是否存在 -> 创建用户 → 生成 Token  → 响应结果
    existing_user = await users.get_user_by_username(db, user_data.username)
    if existing_user:
        raise HTTPException(status_code=status.HTTP_400_BAD_REQUEST, detail="用户已存在")
    user = await users.create_user(db, user_data)
    token = await users.create_token(db, user.id)

    # model_validate 方法:将 ORM 对象转换为 Pydantic 模型实例
    response_data = UserAuthResponse(token=token, user_info=UserInfoResponse.model_validate(user))
return success_response(message="注册成功", data=response_data)全局异常处理器
定义异常处理类 -> 定义注册类 -> 在 main.py 中注册
python
# 异常处理类
DEBUG_MODE = True  # 开发模式:返回详细错误信息,生产模式:返回简化错误信息
async def http_exception_handler(request: Request, exc: HTTPException):
    """
    处理 HTTPException 异常
    """
    # HTTPException 通常是业务逻辑主动抛出的,data 保持 None
    return JSONResponse(
        status_code=exc.status_code,
        content={
            "code": exc.status_code,
            "message": exc.detail,
            "data": None
        }
    )
......

# 注册类
def register_exception_handlers(app):
    """
    注册全局异常处理:子类在前,父类在后;具体在前,抽象在后
    """
    app.add_exception_handler(HTTPException, http_exception_handler)  # 业务
    app.add_exception_handler(IntegrityError, integrity_error_handler)  # 数据完整性约束
    app.add_exception_handler(SQLAlchemyError, sqlalchemy_error_handler)  # 数据库
    app.add_exception_handler(Exception, general_exception_handler)  # 兜底

# main.py 中注册
register_exception_handlers(app)获取 token
python
# 整合 根据 Token 查询用户,返回用户
async def get_current_user(
        authorization: str = Header(..., alias="Authorization"),
        db: AsyncSession = Depends(get_db)
):
    # Bearer xxxxx
    # token = authorization.split(" ")[1]
    token = authorization.replace("Bearer ", "")
    user = await users.get_user_by_token(db, token)
    if not user:
        raise HTTPException(status_code=status.HTTP_401_UNAUTHORIZED, detail="无效的令牌或已经过期的令牌")

    return user